

 Find content
 Male
Male


Well, we all had a few days to play with it. I would like to see everyone's opinions on what they like and dislike.
iBotModz CBox
#94938 IPB 3 or IPB 2
 Posted by
on 15 June 2009 - 09:01 PM
Posted by
on 15 June 2009 - 09:01 PM
#94014 How To Mod Avatar Skin Color
Posted by
on 10 June 2009 - 09:35 AM
Yea, Peaches meant to say you opened your profile instead of your avatar file.
It is a very small file, and someone can upload theirs because avatar files work from console to console.
It is a very small file, and someone can upload theirs because avatar files work from console to console.
- T3A guy likes this
#84442 Firmware Flashing Megaguide
Posted by
on 27 April 2009 - 04:19 PM
LiteOn Drives
Ok, this drive type is more difficult. You will need the following:
Step 2: Turn off your computer. Take the drive out of your Xbox360 and open it. Hook it up to your CK3 with probe. Turn your computer on and then when it boots turn on your CK3.

Step 3: Click eject on the CK3. Power the CK3 off, then manually push the tray half way back in. Then turn the CK3 back on. After that, open JungleFlasher, and go to the DVDKey32 tab. Select your proper COM and I/O ports and your drive will be displayed.
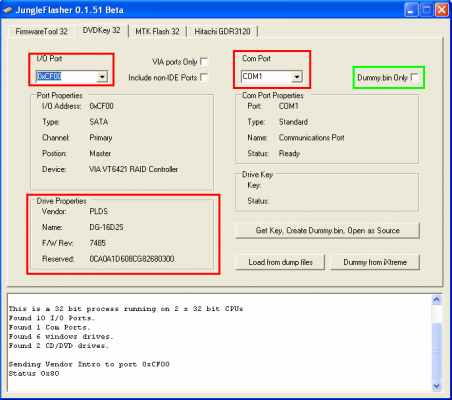
Step 4: Insert your probe into the R707 hole and click Get Key, Create Dummy.bin, Open as Source. While it is reading, steadily hold your probe in place. It will make a few reads. Save your file somewhere, then click yes when the auto-load message pops up. It will take you to the FirmTool32 tab.
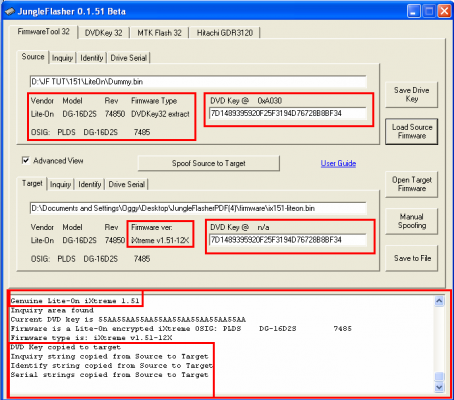
Step 5: Make sure your keys are the same, and then click Save to File. Save it then navigate to the MTKFlash32 tab. Now, this part is no turning back. If you freeze during this step, your firmware will be deleted and not able to play. However, it is simple to reflash it in Dos, if you mess up here. Google will help you with that... Now, hit LiteOn erase. It will prompt you several times. As soon as you see the dots at the buttom saying erasing, power cycle the CK3 by turning it off and back on within 2 seconds.
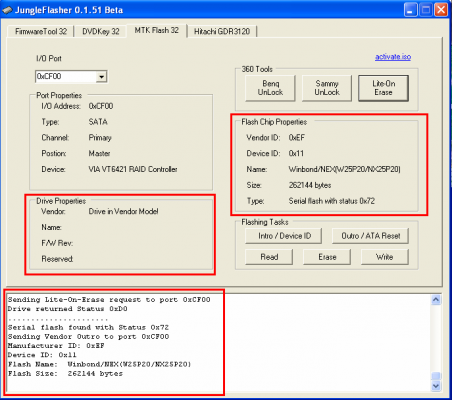
Step 6: You will now see the drive is in vendor mode. Now, just click write, it will write then when that is done click Outro / ATA Reset and you are done! You just flashed the most complicated drive in 6 steps!
- A compatible chipset (trial and error works, you can't mess anything up when just reading)
- A SATA cable.
- This download - yungbol's LiteOn kit.
 yungbol__s_kit.rar 2.33MB
380 downloads
yungbol__s_kit.rar 2.33MB
380 downloads - A 32-bit OS.
- An Xecuter CK3 Connectivity Kit with Probe
- Xecuter CK3 drivers (Vista, XP and lower)

Step 2: Turn off your computer. Take the drive out of your Xbox360 and open it. Hook it up to your CK3 with probe. Turn your computer on and then when it boots turn on your CK3.
Step 3: Click eject on the CK3. Power the CK3 off, then manually push the tray half way back in. Then turn the CK3 back on. After that, open JungleFlasher, and go to the DVDKey32 tab. Select your proper COM and I/O ports and your drive will be displayed.
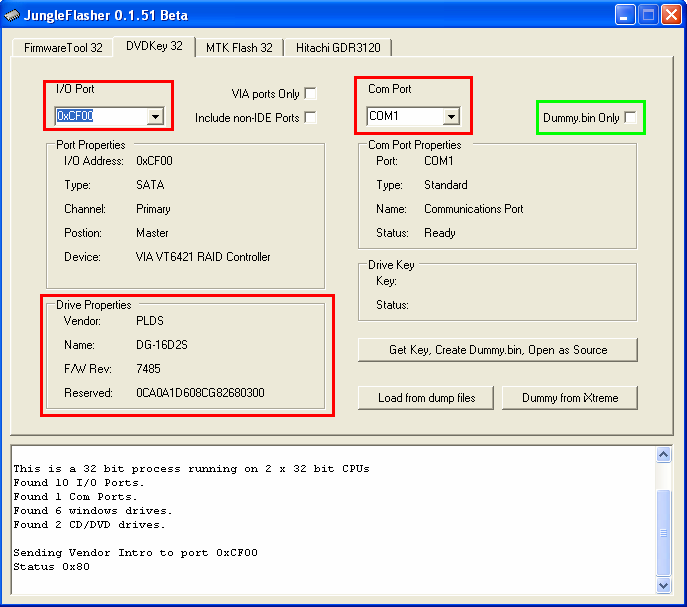
Step 4: Insert your probe into the R707 hole and click Get Key, Create Dummy.bin, Open as Source. While it is reading, steadily hold your probe in place. It will make a few reads. Save your file somewhere, then click yes when the auto-load message pops up. It will take you to the FirmTool32 tab.

Step 5: Make sure your keys are the same, and then click Save to File. Save it then navigate to the MTKFlash32 tab. Now, this part is no turning back. If you freeze during this step, your firmware will be deleted and not able to play. However, it is simple to reflash it in Dos, if you mess up here. Google will help you with that... Now, hit LiteOn erase. It will prompt you several times. As soon as you see the dots at the buttom saying erasing, power cycle the CK3 by turning it off and back on within 2 seconds.

Step 6: You will now see the drive is in vendor mode. Now, just click write, it will write then when that is done click Outro / ATA Reset and you are done! You just flashed the most complicated drive in 6 steps!
- iBotPeaches, fastmouth808, PREPPY DIABLO and 1 other like this
#84441 Firmware Flashing Megaguide
Posted by
on 27 April 2009 - 04:18 PM
BenQ Drives
Ok, this drive type is very easy as well. You will need the following:

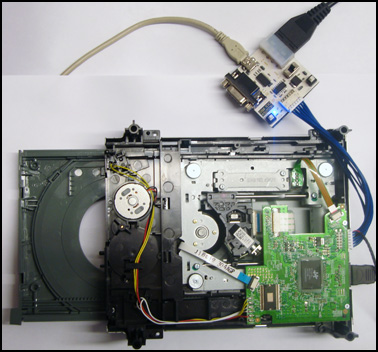
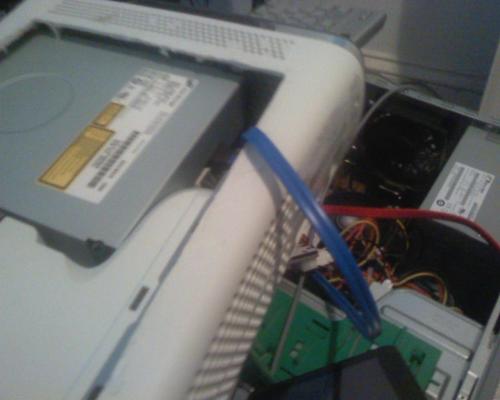
Step 2: Shut down your computer. Hook your Xbox360 up like you normally would when playing (power cord and video cord). The Xbox needs to be opened, and next to your computer. The SATA cable in back of the drive should be unplugged, and insert the one that is connected to your computers SATA chipset like so:

Step 3: Now, power on your PC then wait a few seconds until it boots up and turn on the Xbox 360.
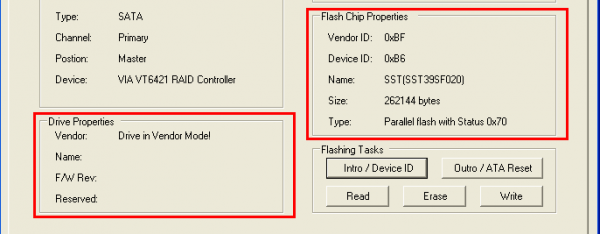
Step 4: Open up JungleFlasher.exe. Navigate to the MTKFlash32 tab. Search your I/O ports for the one that has your BenQ Device in the Device Properties. Once you find it, it should look like so:
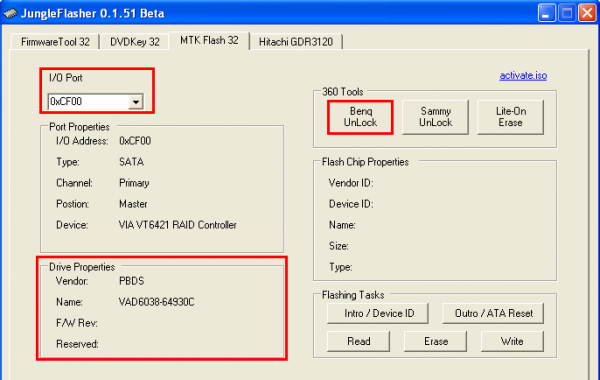
Step 5: Once your info is there, click BenQ unlock. If you cannot find your info, change SATA ports, and if that doesn't work, then your chipset is not compatible or your PORTIO32 isn't installed.
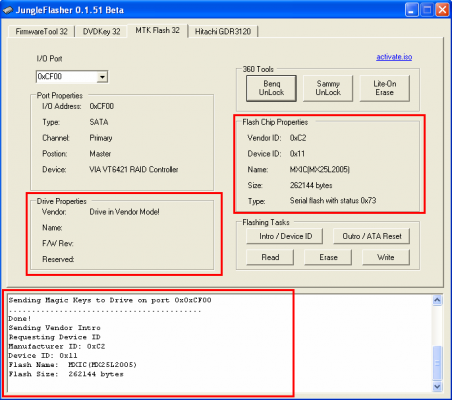
Step 6: Make sure the drive is in Vendor Mode (0x70) and returned a good flash chip property; you can check under Flash Chip Properties, Drive Properties should show �??Drive in Vendor Mode!�?�.
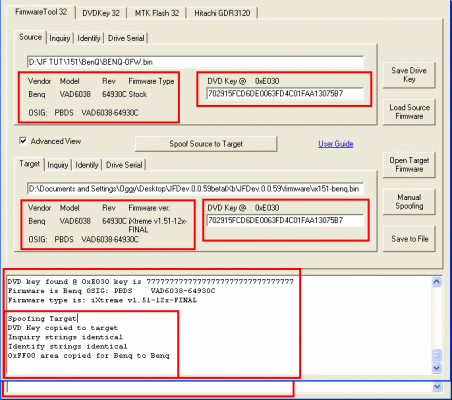
Step 7: Click Read. Once it reads, it will ask you to save it. Save it somewhere safe, this is your original firmware file. Keep this. When it ask you to auto-load, click yes. It will bring you to the Firmtool32 tab.
Step 8: Confirm your keys are the same, and your info. Once that, click Save to file. After you save, navigate back to the MTKFlash32 tab.
Step 9: Click Write. It will erase, and write your new firmware. Once that is verified OK, click Outro / ATA reset.
Step 10: YOU ARE DONE! Disconnect everything, hook it back up, and go burn some games!
Ok, this drive type is very easy as well. You will need the following:
- A compatible chipset (trial and error works, you can't mess anything up when just reading)
- A SATA cable.
- This download - yungbol's BenQ kit.
yungbol__s_kit.rar 2.33MB
408 downloads
- A 32-bit OS.
Step 2: Shut down your computer. Hook your Xbox360 up like you normally would when playing (power cord and video cord). The Xbox needs to be opened, and next to your computer. The SATA cable in back of the drive should be unplugged, and insert the one that is connected to your computers SATA chipset like so:

Step 3: Now, power on your PC then wait a few seconds until it boots up and turn on the Xbox 360.
Step 4: Open up JungleFlasher.exe. Navigate to the MTKFlash32 tab. Search your I/O ports for the one that has your BenQ Device in the Device Properties. Once you find it, it should look like so:

Step 5: Once your info is there, click BenQ unlock. If you cannot find your info, change SATA ports, and if that doesn't work, then your chipset is not compatible or your PORTIO32 isn't installed.
Step 6: Make sure the drive is in Vendor Mode (0x70) and returned a good flash chip property; you can check under Flash Chip Properties, Drive Properties should show �??Drive in Vendor Mode!�?�.

Step 7: Click Read. Once it reads, it will ask you to save it. Save it somewhere safe, this is your original firmware file. Keep this. When it ask you to auto-load, click yes. It will bring you to the Firmtool32 tab.
Step 8: Confirm your keys are the same, and your info. Once that, click Save to file. After you save, navigate back to the MTKFlash32 tab.

Step 9: Click Write. It will erase, and write your new firmware. Once that is verified OK, click Outro / ATA reset.
Step 10: YOU ARE DONE! Disconnect everything, hook it back up, and go burn some games!
- iBotPeaches, PREPPY DIABLO and Pargy like this
#84440 Firmware Flashing Megaguide
Posted by
on 27 April 2009 - 04:18 PM
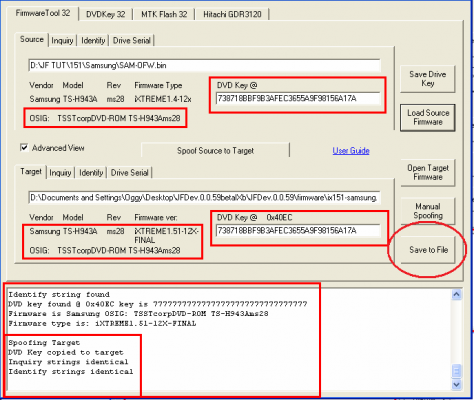
Samsung Drives
Ok, this drive type is very easy. You will need the following:

Step 2: Shut down your computer. Hook your Xbox360 up like you normally would when playing (power cord and video cord). The Xbox needs to be opened, and next to your computer. The SATA cable in back of the drive should be unplugged, and insert the one that is connected to your computers SATA chipset like so:
Step 3: Now, power on your PC then wait a few seconds until it boots up and turn on the Xbox 360.
Step 4: Open up JungleFlasher.exe. Navigate to the MTKFlash32 tab. Search your I/O ports for the one that has your ms25 or ms28 in the Device Properties. Once you find it, it should look like so:

Step 5: Once your info is there, click Sammy unlock. If you cannot find your info, change SATA ports, and if that doesn't work, then your chipset is not compatible or your PORTIO32 isn't installed.
Step 6: Make sure the drive is in Vendor Mode (0x70) and returned a good flash chip property; you can check under Flash Chip Properties, Drive Properties should show �??Drive in Vendor Mode!�?�.
Step 7: Click Read. Once it reads, it will ask you to save it. Save it somewhere safe, this is your original firmware file. Keep this. When it ask you to auto-load, click yes. It will bring you to the Firmtool32 tab.
Step 8: Confirm your keys are the same, and your info. Once that, click Save to file. After you save, navigate back to the MTKFlash32 tab.
Step 9: Click Write. It will erase, and write your new firmware. Once that is verified OK, click Outro / ATA reset.
Step 10: YOU ARE DONE! Disconnect everything, hook it back up, and go burn some games!
- A compatible chipset (trial and error works, you can't mess anything up when just reading)
- A SATA cable.
- This download - yungbol's Sammy kit.
yungbol__s_kit.rar 2.33MB
410 downloads
- A 32-bit OS.

Step 2: Shut down your computer. Hook your Xbox360 up like you normally would when playing (power cord and video cord). The Xbox needs to be opened, and next to your computer. The SATA cable in back of the drive should be unplugged, and insert the one that is connected to your computers SATA chipset like so:

Step 3: Now, power on your PC then wait a few seconds until it boots up and turn on the Xbox 360.
Step 4: Open up JungleFlasher.exe. Navigate to the MTKFlash32 tab. Search your I/O ports for the one that has your ms25 or ms28 in the Device Properties. Once you find it, it should look like so:

Step 5: Once your info is there, click Sammy unlock. If you cannot find your info, change SATA ports, and if that doesn't work, then your chipset is not compatible or your PORTIO32 isn't installed.
Step 6: Make sure the drive is in Vendor Mode (0x70) and returned a good flash chip property; you can check under Flash Chip Properties, Drive Properties should show �??Drive in Vendor Mode!�?�.

Step 7: Click Read. Once it reads, it will ask you to save it. Save it somewhere safe, this is your original firmware file. Keep this. When it ask you to auto-load, click yes. It will bring you to the Firmtool32 tab.
Step 8: Confirm your keys are the same, and your info. Once that, click Save to file. After you save, navigate back to the MTKFlash32 tab.

Step 9: Click Write. It will erase, and write your new firmware. Once that is verified OK, click Outro / ATA reset.
Step 10: YOU ARE DONE! Disconnect everything, hook it back up, and go burn some games!
- iBotPeaches, PREPPY DIABLO and Pargy like this
#84439 Firmware Flashing Megaguide
Posted by
on 27 April 2009 - 04:17 PM
How to flash your Xbox360's firmware
A guide on flashing your firmware to allow you to play backups or burned games without being detected by Xbox Live.
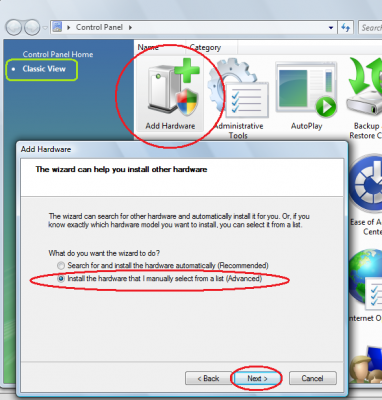
First of all, the very first thing you will need to do is find out what type of drive you have. Use the diagrams below to determine this.
Pop off your faceplate, and look in the little hole in the drive at the color of the wires.
Samsung:

If you have this, click here!
Hitachi:
If you have this, click here (external guide)!
BenQ:

If you have this, click here!
LiteOn:

If you have this, click here!
Credits:
Team Jungle - apps, pics, FW
LLama - pics
Me - typing this up
DONT RIP
First of all, the very first thing you will need to do is find out what type of drive you have. Use the diagrams below to determine this.
Pop off your faceplate, and look in the little hole in the drive at the color of the wires.
Samsung:

If you have this, click here!
Hitachi:

If you have this, click here (external guide)!
BenQ:

If you have this, click here!
LiteOn:

If you have this, click here!
Credits:
Team Jungle - apps, pics, FW
LLama - pics
Me - typing this up
DONT RIP
- iBotPeaches, Xx Legacy xX and Pargy like this
#74847 COD 5 Golden Clan Tag
Posted by
on 15 March 2009 - 08:42 PM
JUSTREC, I don't care about your "kiddy shit", I just am saying you go and insult people saying noobs and talking shit on me in the shoutbox when I am not even there. I am just spreading the knowledge of they give you a redeemable code, for collectors edition content. You are completely wrong and flame to get away from your error. Just stop, I am not the flaming type but you set me off on a bad note. I have more important things then to worry about you.
- miinaturvat likes this
#74710 [C#] Basic Info for Modding Apps.
Posted by
on 15 March 2009 - 03:52 PM
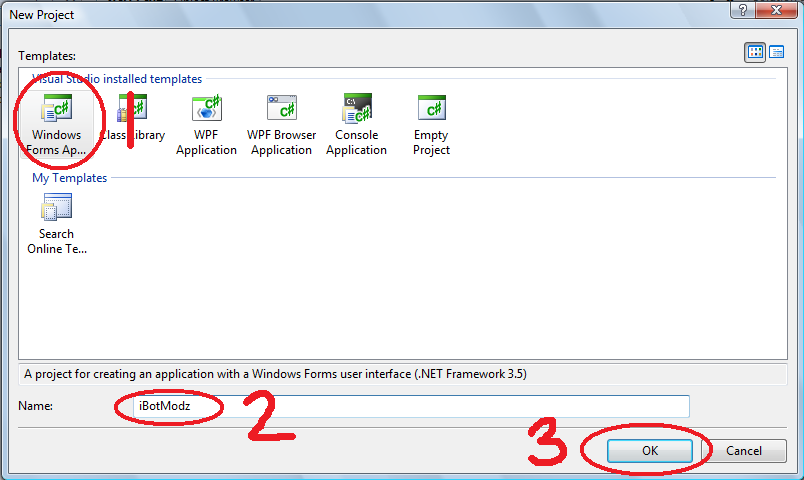
C#, Ah what a language!
Ok, create a new windows form application in C# 2008 .NET.
The first thing I like to do is set up my form properties. What I do is the following settings:
- Maximize Box = false.
- Form Border Style = Fixed Single.
- Change the text of my form.

Now we throw a button and label it open along with a textbox.
Now, we will learn the basic terminology to open a file.
- Double click your button to bring up the code.
- Type the following
OpenFileDialog ofd = new OpenFileDialog(); ofd.Filter = "All Files|*.*"; if (ofd.ShowDialog() == DialogResult.OK) { textBox1.Text = ofd.FileName; } else { }Explanation of code - The ofd is giving the OpenFileDialog a nickname. We can now refer to it as ofd. The ofd.Filter is the type of files we can select. In this instance we want all files. Now, the if statement is basically saying "if a user selects a file and clicks ok, this will happen. The else statement is telling what happens if they cancel or X out. In this instance nothing special happens. When the OK is selected, the textbox will display the file path of the file selected so now the application knows what file to access.
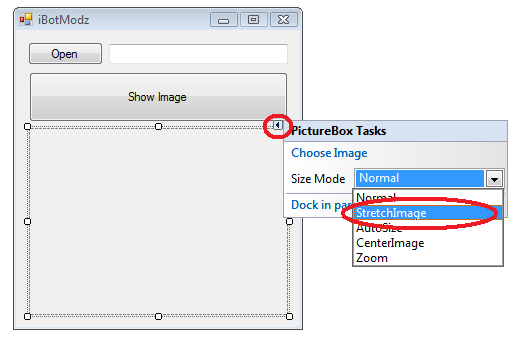
Now your form should look like the following:

Go ahead and debug your app (by clicking the play button [circled in blue])
Now time for the real code after the file is loaded. So, navigate to the namespace (see below) and add the following code:
using System.IO;
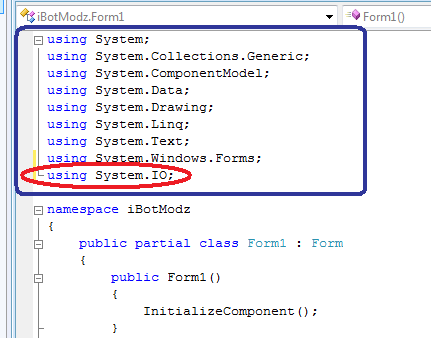
Explanation of code - Adding the System.IO will give you more features into your app for Binary Reading/Writing (hex editing).
Ok, now that you have set that up we will create a setup on how to display the image in the CON header into a picturebox. So, add a button and name it Show Image, and add a picturebox onto your form. Change the picturebox's properties to 'Stretch Image'.
Now double click on the Show Image button so we can add some code. This is where I may lose you in the tutorial, if you don't understand something, read the explanation below.
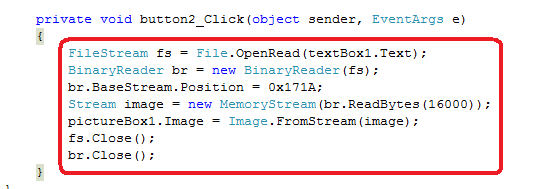
Add the following code, I will explain it after you add it:
FileStream fs = File.OpenRead(textBox1.Text); BinaryReader br = new BinaryReader(fs); br.BaseStream.Position = 0x171A; Stream image = new MemoryStream(br.ReadBytes(16000)); pictureBox1.Image = Image.FromStream(image); fs.Close(); br.Close();
Explanation of code:
- The fs is creating a filestream or 'file browser'. What it does is will "open and read" the hex data of the file we selected.
- The textBox1.Text is the file location.
- BinaryReader is what reads the hex data we want.
- The BaseStream.Position is where we want to set the 'cursor' at so we can begin our read.
- The Memory Stream is reading 16000 (enough) bytes (which is the image's hex) and sending it to memory so we can later use it.
- Then the picturebox is showing the stream of the image so we can show it.
- The Close(); is just closing all our Streams and Readers so we don't get an error later that the file is in use with another process.
Now, go debug you app and test it out. Open a file then show image. It will show the game's image. This is just a small step and soon when I get more time I will create on how to find and edit data in a save. Good luck and happy coding.
Result:

- ixGAMEOVERxixx and Guepassorse like this


Community Forum Software by IP.Board 3.4.6
Licensed to: Connor (iBotPeaches)