
The Complete Halo 3 Modding Tutorial (Part 3 of 5)
Written by iBotPeaches of iBotModz.net
Requirements
Warning
If your TV that you intend on doing this tutorial with runs Halo 3 in "wide screen" (Wide screen is when you click the guide button and the whole screen is not covered) I suggest you change it to full screen. Screen shots taken in wide screen mode are a different resolution and size and will not get the same numbers that are in this tutorial.
Steps
If you have an account that you would like to make your screenshots on, sign onto that. We don't want our main account to be banned. I'm going to sign into my other account.

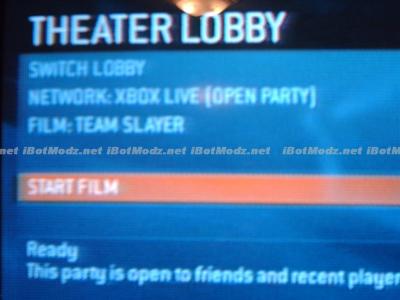
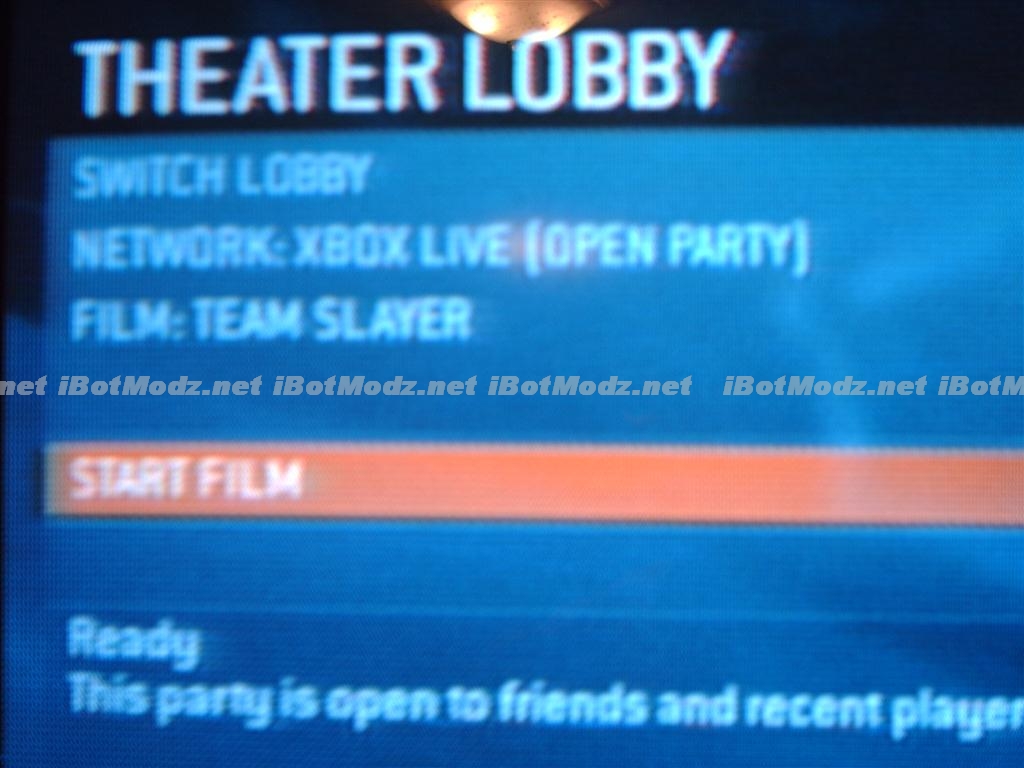
Lets boot up Halo 3 in full screen, and get to theatre mode. We are going to start a random film and take a completely random screen shot.
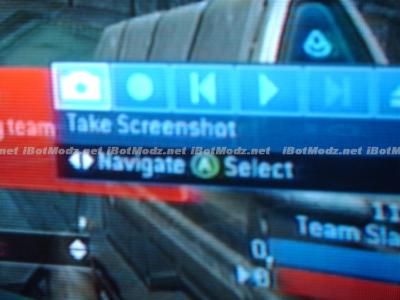
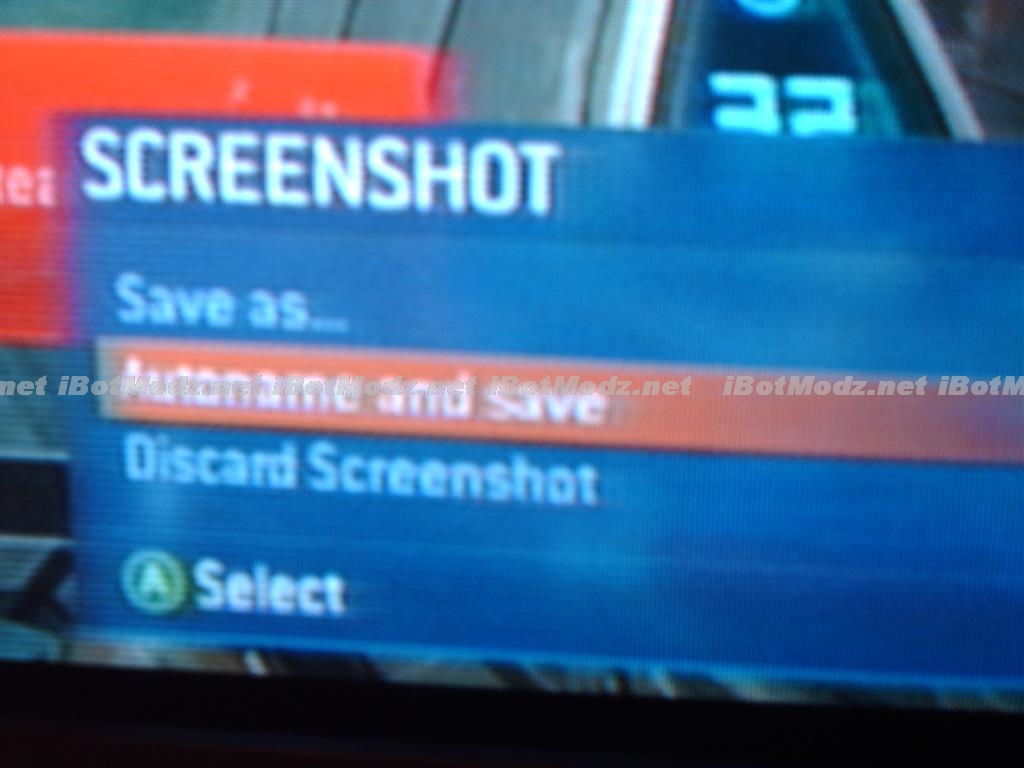
Once you get that to load, start it. Press A and X in the beginning to stop the film and bring up the tool box.
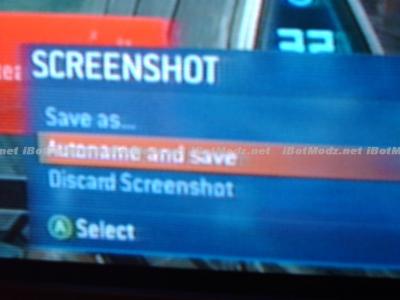
You can click either "autoname & save" or "Save as..." I picked autoname and save because I've yet to know what my screenshot is going to be or called. You can change the name once you've modded the screen shot
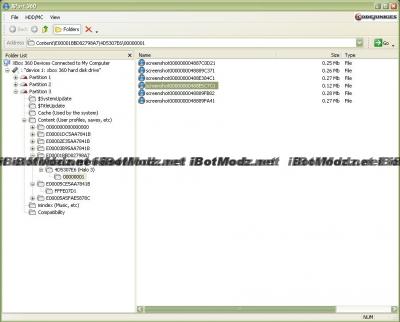
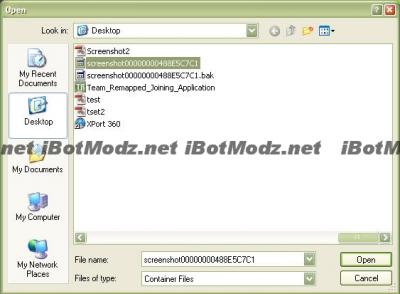
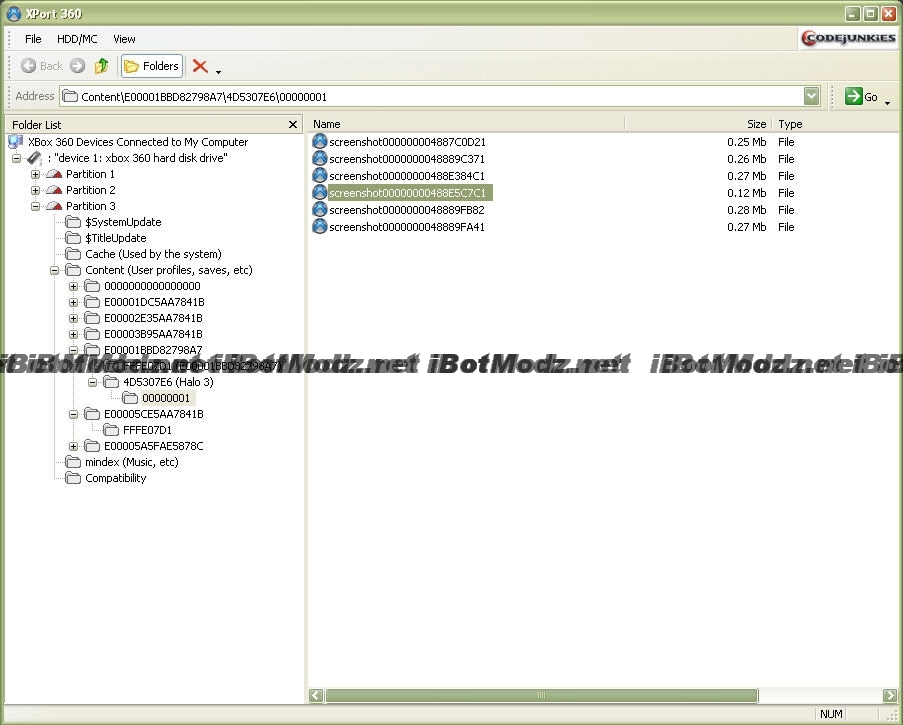
Since the other parts of this tutorial explained how to move content between your 360 and computer. I will skip right by that, we will start at the screenshot container on your xPort/Xplorer 360. Guess and check until you have your screenshot container file on your desktop. Something that can help, most modded screenshots end up being 0.27 mb and normal screen shots remain at 0.12mb (This is most of the time, yours might be different)
Now copy this file to your desktop, assuming you have the right file. (I keep mine on my desktop)
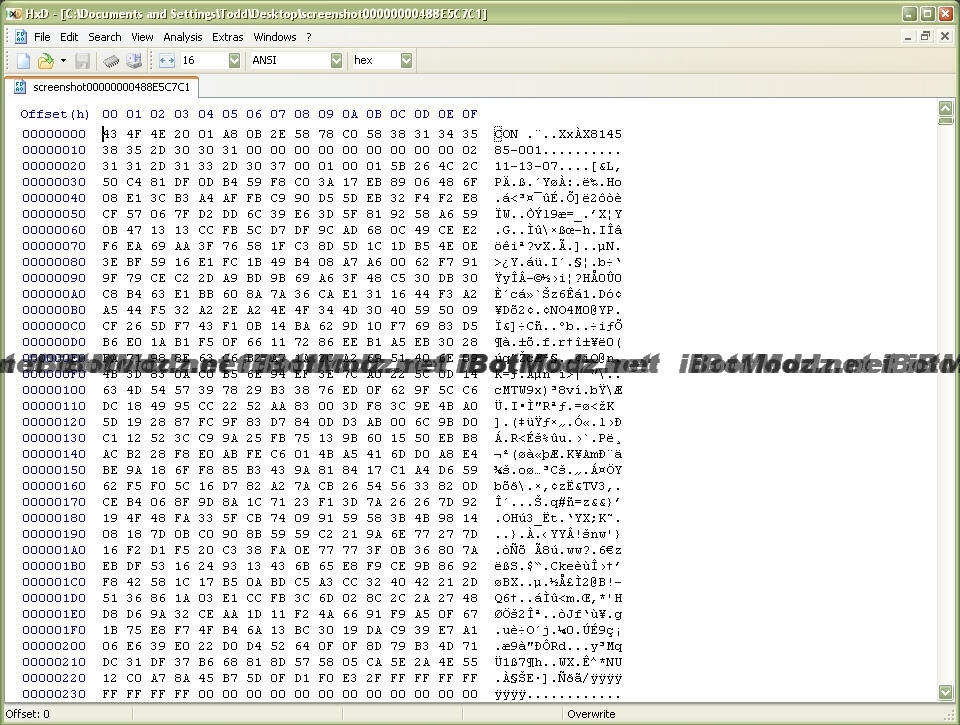
Now open up HxD Hex Editor and open the screen shot container file you just got.
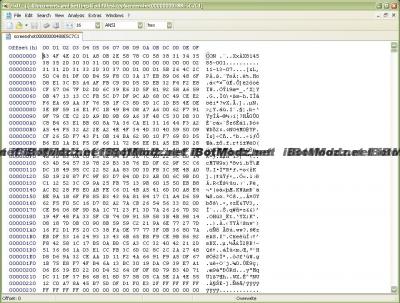
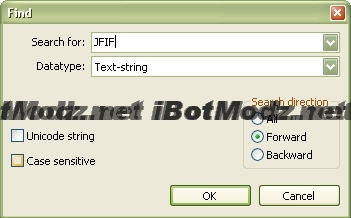
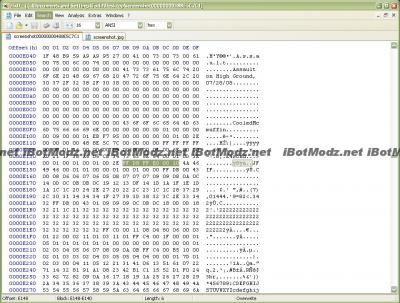
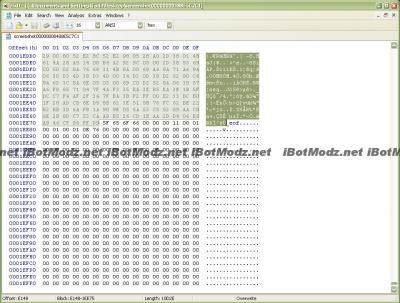
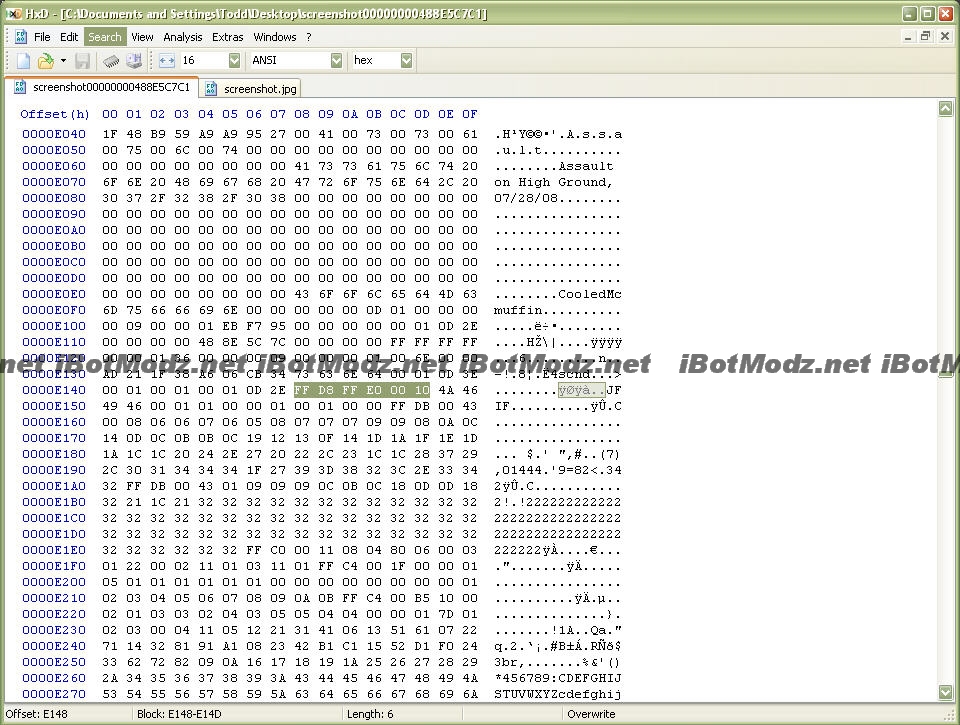
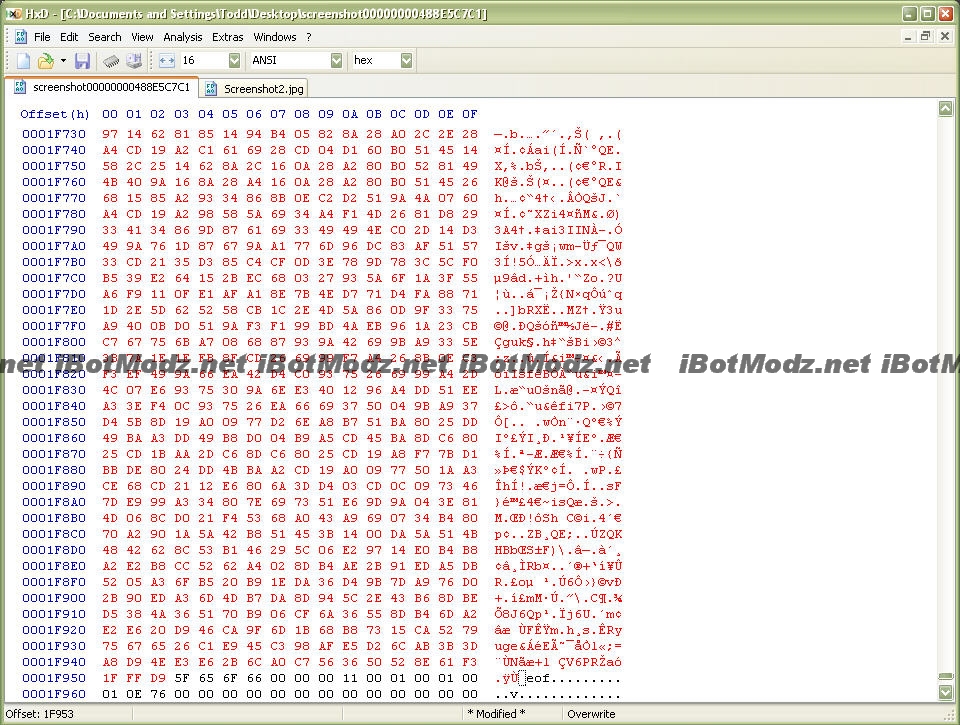
We are going to extract the pure screen shot from this file. Start off by pressing "Ctrl+F" and search the word JFIF
This should automatically bring you to something simliar as this screenshot below.
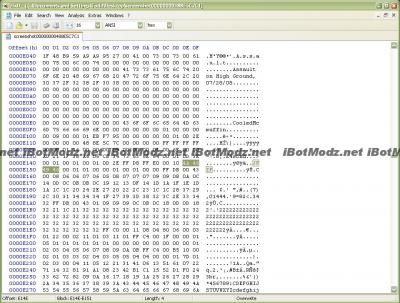
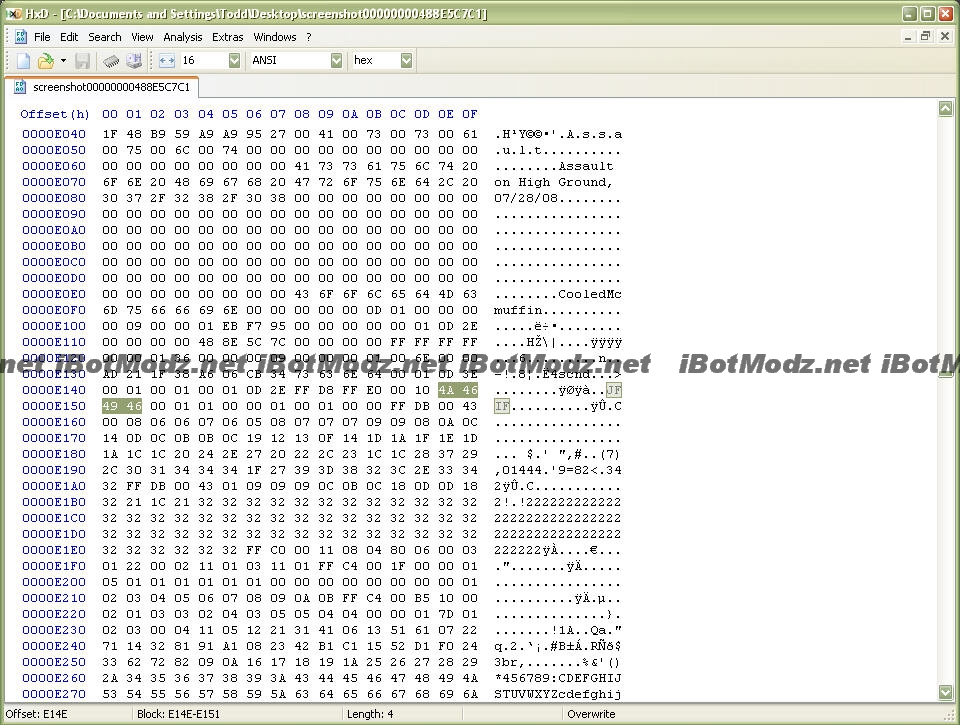
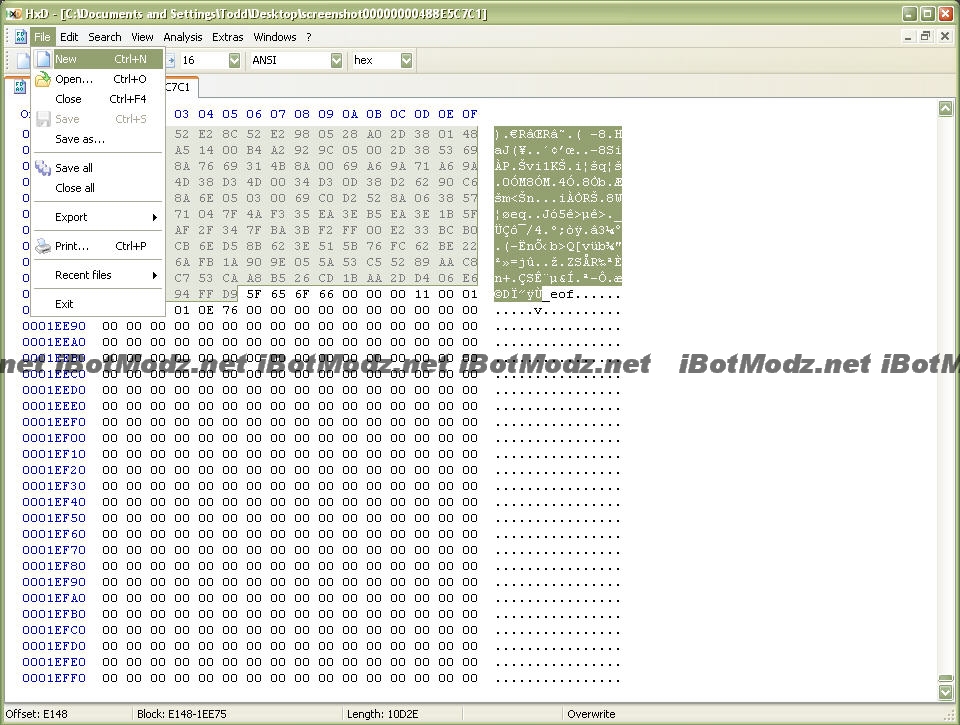
This part is tricky!. Please follow it. You will want to take your mouse and select back from JFIF until you reach the end of the word "yoya" This picture below should help explain it better. Please don't select any part of the word JFIF. On the bottom of the picture it shows what block your currently on. Ours says "E148" so we will write down that sequence of numbers for the future.
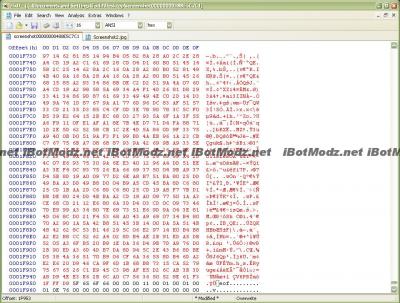
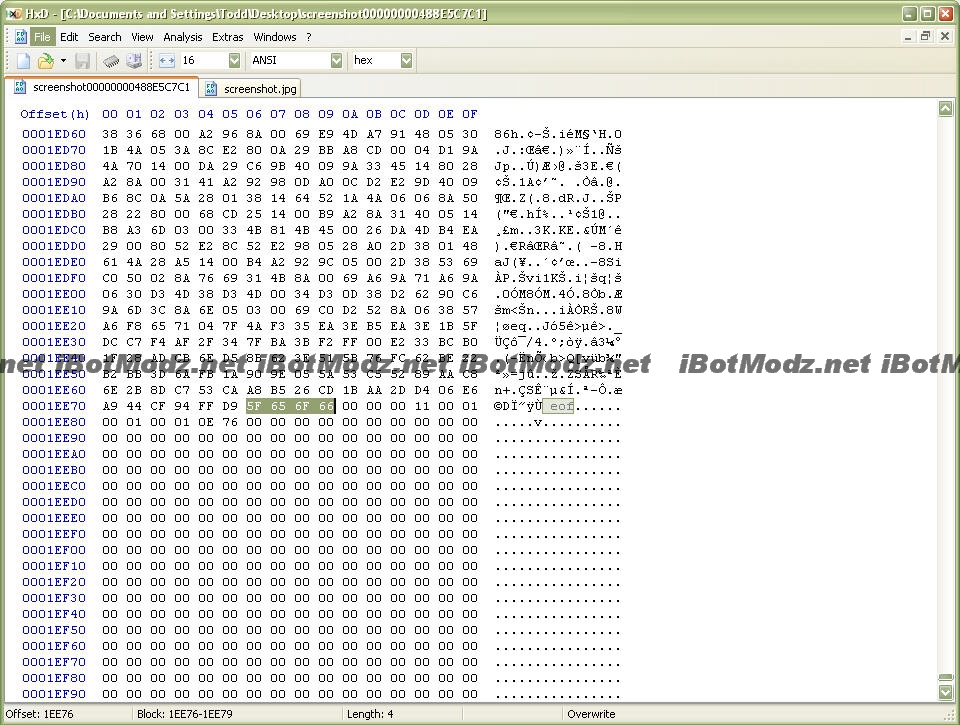
Now we have to find the end of the screen shot. So "CTRL+F" the word "_eof"
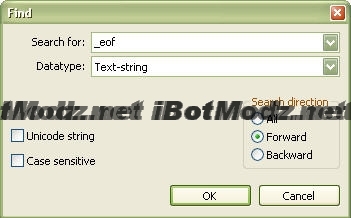
This will bring up the "_eof" part of your screen shot.
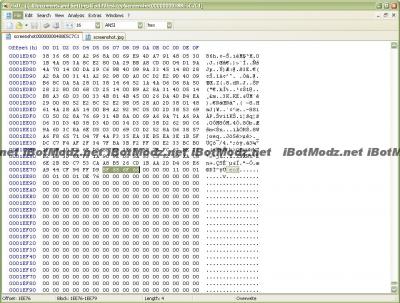
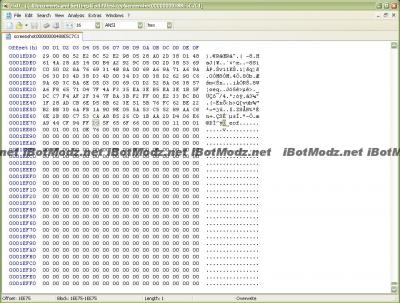
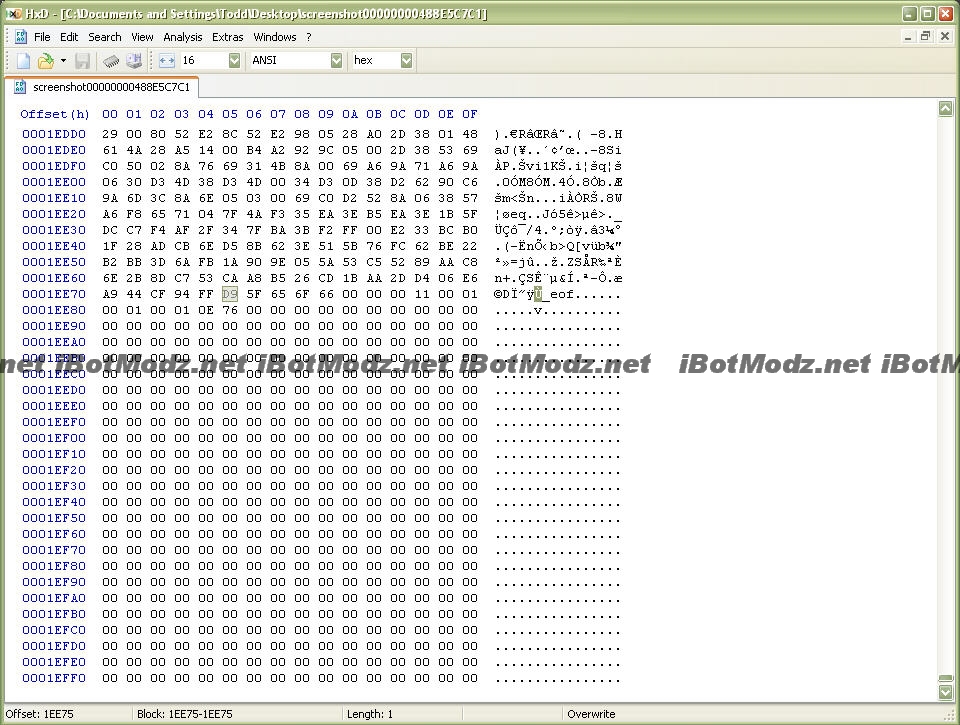
Now select the first pair before the actual "_eof"
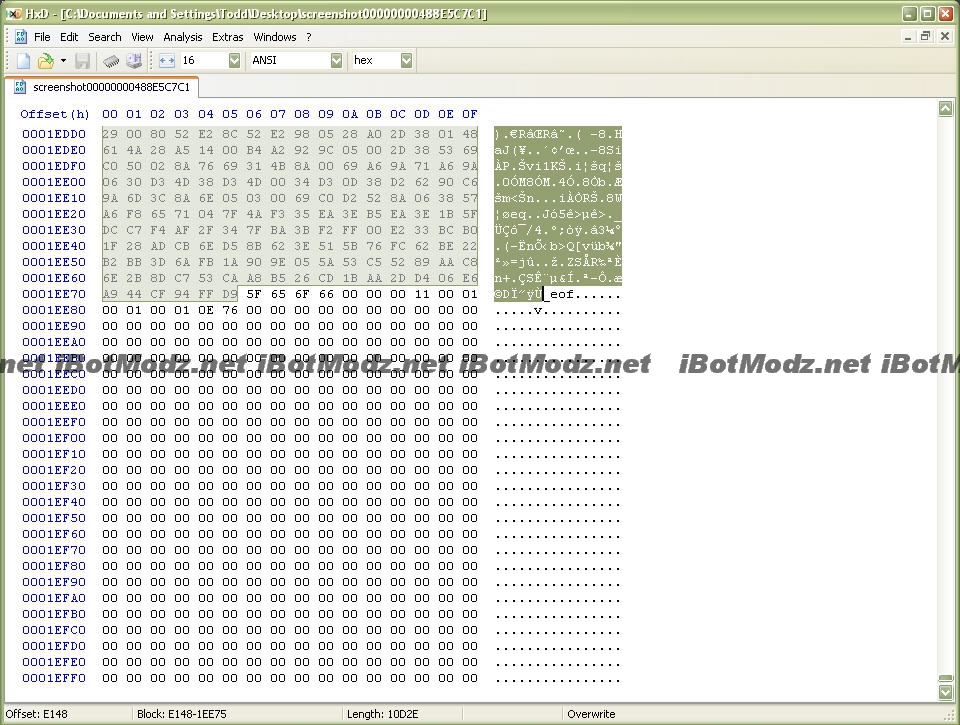
Now that we have the whole entire screen shot parts. We can extract it. Click "CTRL+E" to bring up the Selecting Blocks menu. For the first block input that number we wrote down awhile back. Mine was E148 (Yours should be identical if your screenshot size was the same)

Now this should automatically select all the texts which is the screen shot. Simply click "CTRL+C" (to copy it)
Now make a new file and paste all of that text you selected into it
I forgot to get screen shots of this but its fairly simple. Once you've pasted the new code in go to "File, Save as..." Then name is anything.jpg Then close that image out of HxD. We now test the image, opposite click it and go to "Open with... Your image previewer"

Now my image loads successfully. So we can now edit that image. NOTE: DO NOT CHANGE THE SIZE OF THE IMAGE

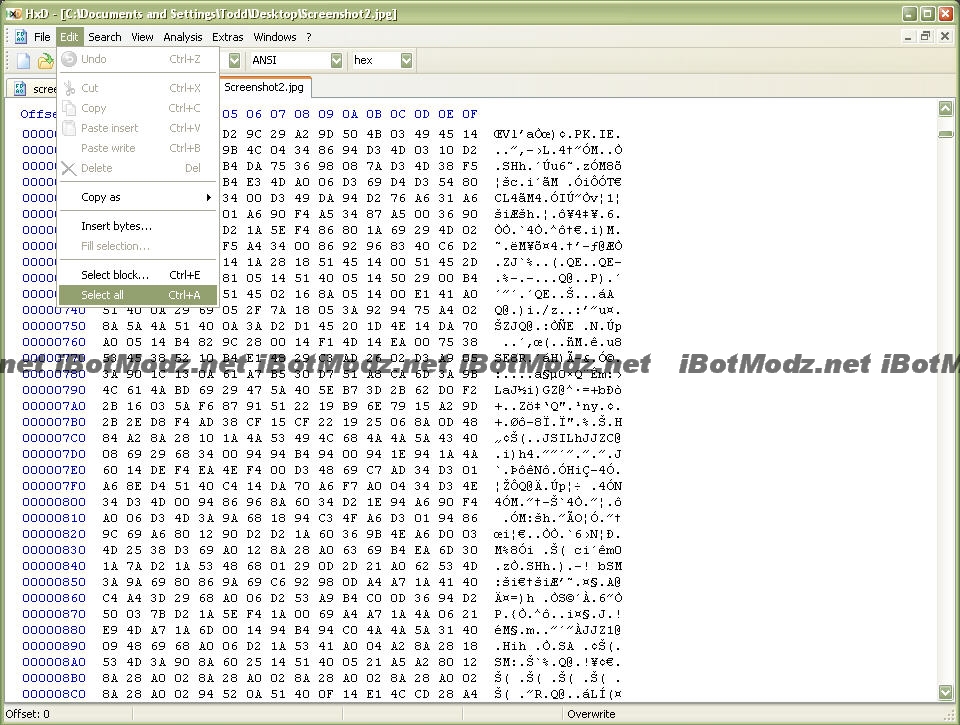
Once you've edited it, re-open that screen shot in HxD Hex Editor. If you get errors when trying to re-open the file, add .jpg at the end it should work. This is the file re-opened. Again you want to click "CTRL+C" and copy this to paste back into the container.
Go back to the screen shot container file, by clicking on it at the top. It should have your selection still saved, so simply click "CTRL+P" and paste over that. The text will turn red showing there was a change, simple "save it" to fix that
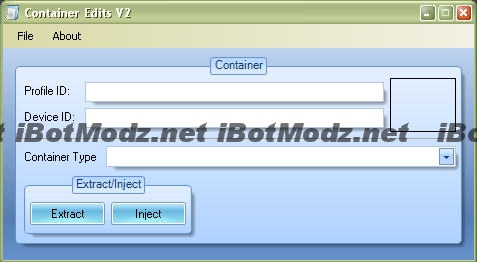
Now we will test our image, open up Container Edits v2
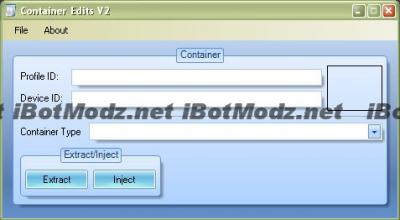
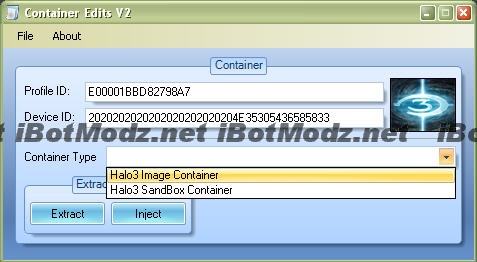
Open up the container of the screenshot. HxD Hex Editor should have made a backup so select the one that doesn't say .bak
Now on the drop down box select "Image Container" since this is an image.

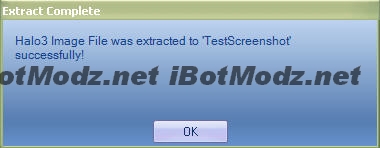
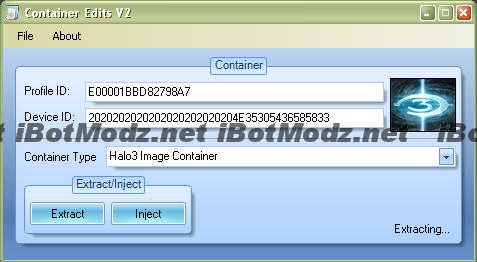
Then click "extract" and name the image "test.jpg" It should promt with "extracting..."

Once done it will say "complete" If not you made an error and should try again with a FRESH container file.
Now we rehash/resign/retransfer to our xbox. I'm not going to cover that since its fairly easy.
And now the screen shot is on your xbox.
Downloads
 Xplorer360.beta6.rar 55KB
521 downloads -> Xplorer 360 Beta 6
Xplorer360.beta6.rar 55KB
521 downloads -> Xplorer 360 Beta 6
360ConSigner.rar 47.04KB
518 downloads -> 360 Con Signer
ContainerEditsv2.rar 994.74KB
546 downloads -> Con Edits v2
HxD_Hex_Editor.rar 630.86KB
561 downloads -> HxD Hex Editor
 Paint.NET.3.35.zip 1.51MB
555 downloads -> Paint.NET 3.35
Paint.NET.3.35.zip 1.51MB
555 downloads -> Paint.NET 3.35
X360_CON_Hasher.rar 6.68KB
564 downloads -> X360 Con Hasher
This was written 100% by iBotPeaches of iBotModz.net. All images and words were written by him. No images were taken, and nothing but the glossary was from 3rd party sites. Part 4 will come very soon. This tutorial is only authorized on iBotModz.net and iBotModz Affiliate sites. If you see this elsewhere. Please contact iBotPeaches.
Written by iBotPeaches of iBotModz.net
Requirements
- -Xbox 360
- -Halo 3
- -xPort or xSata
- -Resigner and ReHasher
- -Container Edits v2
- -HxD Hex Editor
- -Xplorer 360 or xPort Software
- -Read Part 1 and Part 2 of this tutorial
Warning
If your TV that you intend on doing this tutorial with runs Halo 3 in "wide screen" (Wide screen is when you click the guide button and the whole screen is not covered) I suggest you change it to full screen. Screen shots taken in wide screen mode are a different resolution and size and will not get the same numbers that are in this tutorial.
Steps
If you have an account that you would like to make your screenshots on, sign onto that. We don't want our main account to be banned. I'm going to sign into my other account.

Lets boot up Halo 3 in full screen, and get to theatre mode. We are going to start a random film and take a completely random screen shot.
Once you get that to load, start it. Press A and X in the beginning to stop the film and bring up the tool box.

You can click either "autoname & save" or "Save as..." I picked autoname and save because I've yet to know what my screenshot is going to be or called. You can change the name once you've modded the screen shot
Since the other parts of this tutorial explained how to move content between your 360 and computer. I will skip right by that, we will start at the screenshot container on your xPort/Xplorer 360. Guess and check until you have your screenshot container file on your desktop. Something that can help, most modded screenshots end up being 0.27 mb and normal screen shots remain at 0.12mb (This is most of the time, yours might be different)
Now copy this file to your desktop, assuming you have the right file. (I keep mine on my desktop)
Now open up HxD Hex Editor and open the screen shot container file you just got.
We are going to extract the pure screen shot from this file. Start off by pressing "Ctrl+F" and search the word JFIF
This should automatically bring you to something simliar as this screenshot below.
This part is tricky!. Please follow it. You will want to take your mouse and select back from JFIF until you reach the end of the word "yoya" This picture below should help explain it better. Please don't select any part of the word JFIF. On the bottom of the picture it shows what block your currently on. Ours says "E148" so we will write down that sequence of numbers for the future.
Now we have to find the end of the screen shot. So "CTRL+F" the word "_eof"
This will bring up the "_eof" part of your screen shot.
Now select the first pair before the actual "_eof"
Now that we have the whole entire screen shot parts. We can extract it. Click "CTRL+E" to bring up the Selecting Blocks menu. For the first block input that number we wrote down awhile back. Mine was E148 (Yours should be identical if your screenshot size was the same)
Now this should automatically select all the texts which is the screen shot. Simply click "CTRL+C" (to copy it)
Now make a new file and paste all of that text you selected into it
I forgot to get screen shots of this but its fairly simple. Once you've pasted the new code in go to "File, Save as..." Then name is anything.jpg Then close that image out of HxD. We now test the image, opposite click it and go to "Open with... Your image previewer"
Now my image loads successfully. So we can now edit that image. NOTE: DO NOT CHANGE THE SIZE OF THE IMAGE
Once you've edited it, re-open that screen shot in HxD Hex Editor. If you get errors when trying to re-open the file, add .jpg at the end it should work. This is the file re-opened. Again you want to click "CTRL+C" and copy this to paste back into the container.
Go back to the screen shot container file, by clicking on it at the top. It should have your selection still saved, so simply click "CTRL+P" and paste over that. The text will turn red showing there was a change, simple "save it" to fix that
Now we will test our image, open up Container Edits v2
Open up the container of the screenshot. HxD Hex Editor should have made a backup so select the one that doesn't say .bak

Now on the drop down box select "Image Container" since this is an image.
Then click "extract" and name the image "test.jpg" It should promt with "extracting..."
Once done it will say "complete" If not you made an error and should try again with a FRESH container file.
Now we rehash/resign/retransfer to our xbox. I'm not going to cover that since its fairly easy.
And now the screen shot is on your xbox.
Downloads
Xplorer360.beta6.rar 55KB
521 downloads -> Xplorer 360 Beta 6
360ConSigner.rar 47.04KB
518 downloads -> 360 Con Signer
ContainerEditsv2.rar 994.74KB
546 downloads -> Con Edits v2
HxD_Hex_Editor.rar 630.86KB
561 downloads -> HxD Hex Editor
Paint.NET.3.35.zip 1.51MB
555 downloads -> Paint.NET 3.35
X360_CON_Hasher.rar 6.68KB
564 downloads -> X360 Con HasherThis was written 100% by iBotPeaches of iBotModz.net. All images and words were written by him. No images were taken, and nothing but the glossary was from 3rd party sites. Part 4 will come very soon. This tutorial is only authorized on iBotModz.net and iBotModz Affiliate sites. If you see this elsewhere. Please contact iBotPeaches.


