By Halodu03de/Halodu0DSTde
Things needed to make it:
-.Map file of the map you want to edit from http://secure.xboxga...=category&id=19
(In this tutorial, we will be using the map Warehouse.map(aka Foundry))
-.Map file editor
1. Alteration-Download: http://xenon7.net/fi...ration_0052.rar
(This tutorial uses Alteration, which I recommend over construct.)
Things needed to play it:
-A Developers kit(Dev, Stress Test Dev, Demo, Test, or Reviewers kit)
-Xbox 360 Neighborhood
-Halo 3 Xex 1.0 or 1.2 with checks disabled
-Some other basic knowledge
1. Open the map file in Alteration and in the list of tags, expand the HLMT tag (This is the object properties).
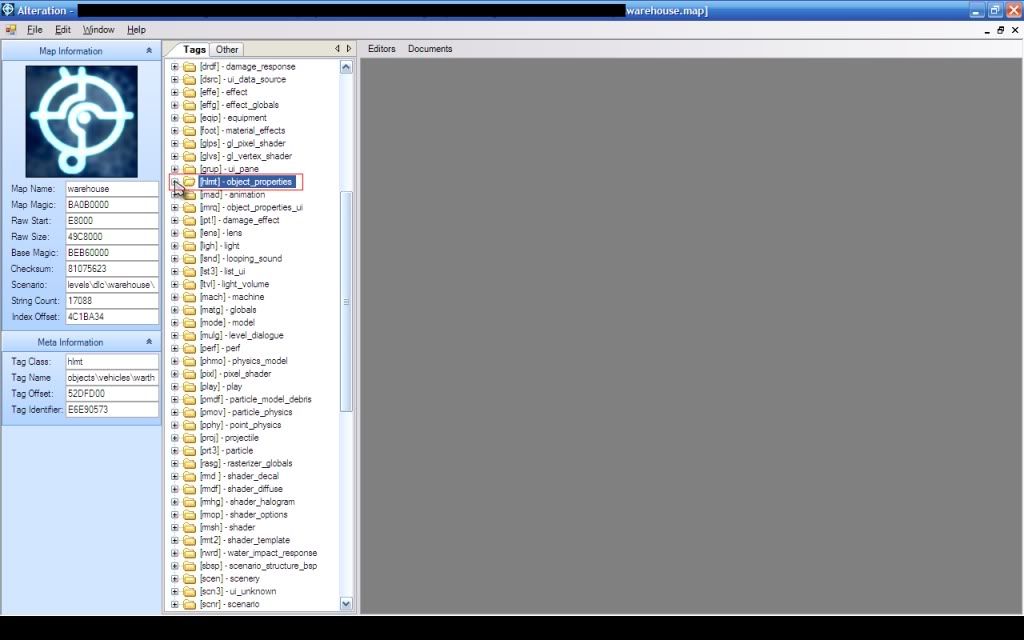
2. Find where it says "objects\vehicles\warthog\warthog" and click on it to open it up.
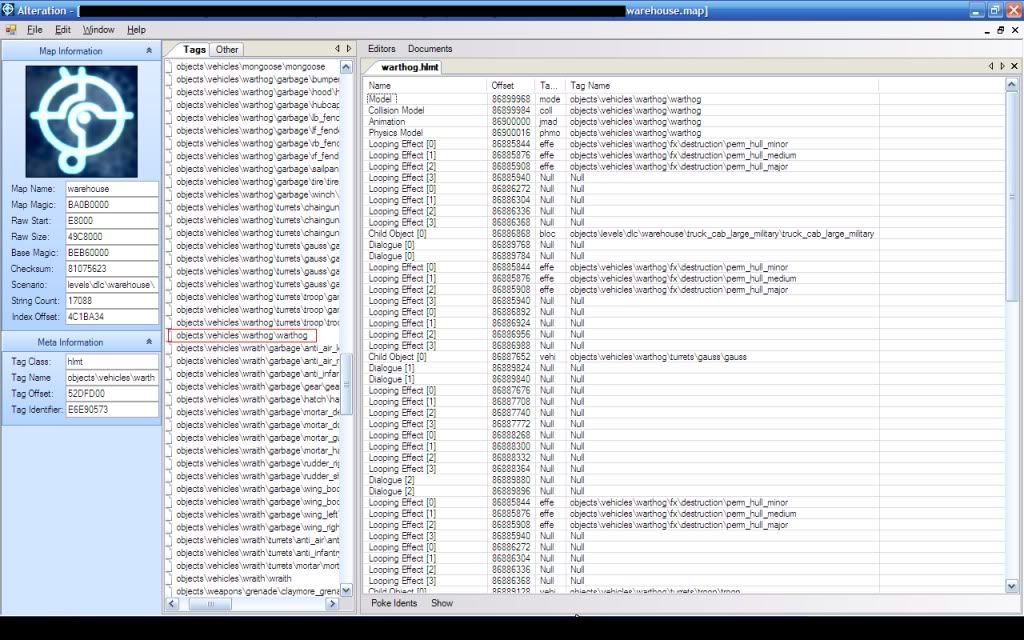
3. At the top of the screen right above where it says "warthog.hlmt" click on 'Editors' and select 'Meta Editor'.
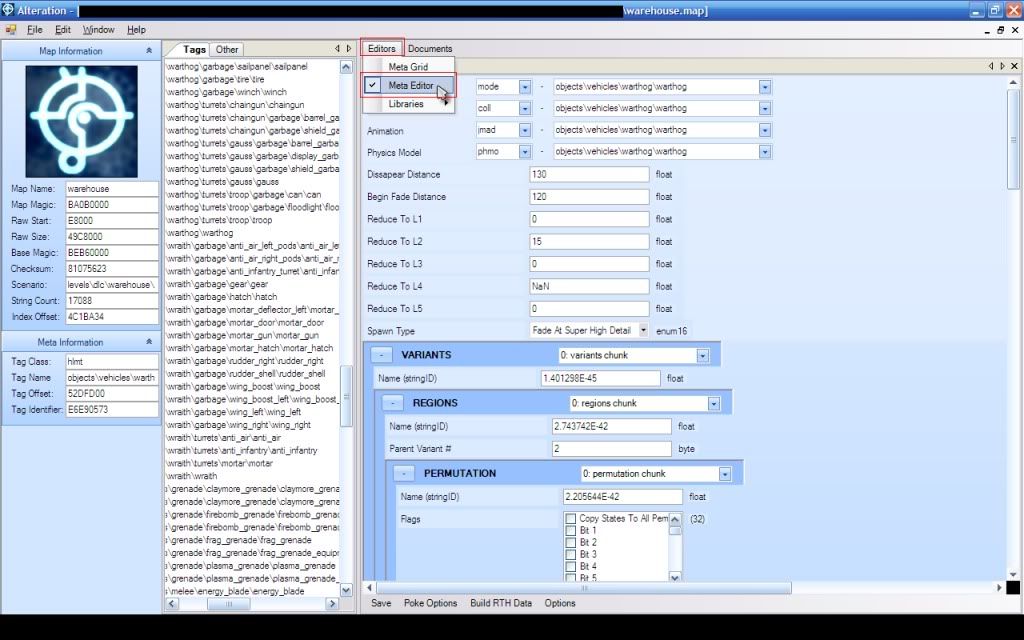
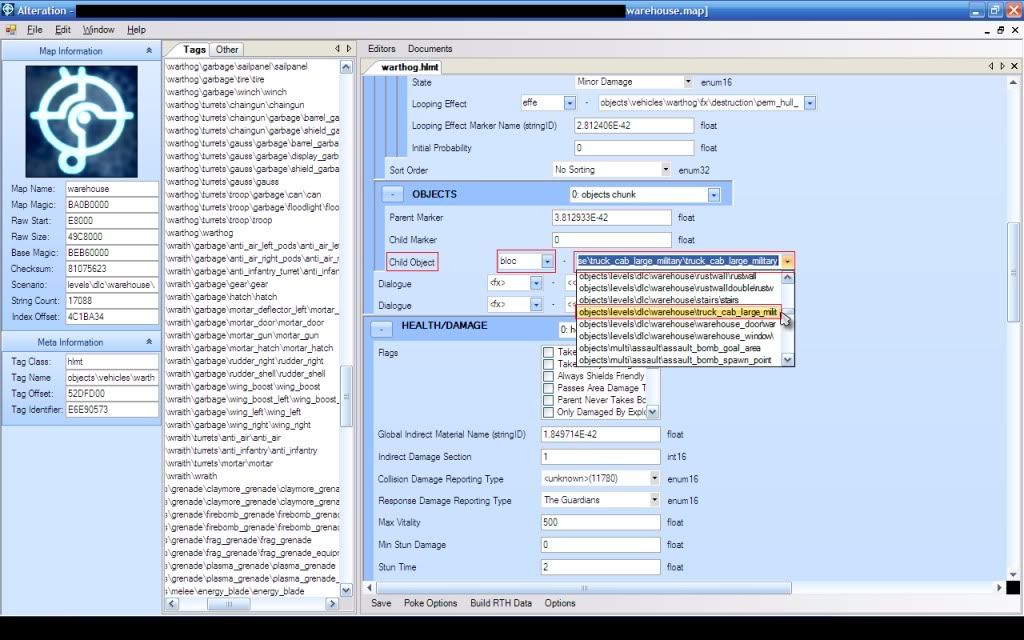
4. Now, scroll down until you find where it says 'OBJECTS' in Bold. And right under that, where it says 'Child
Object'. This is where the turret is attached to the warthog.
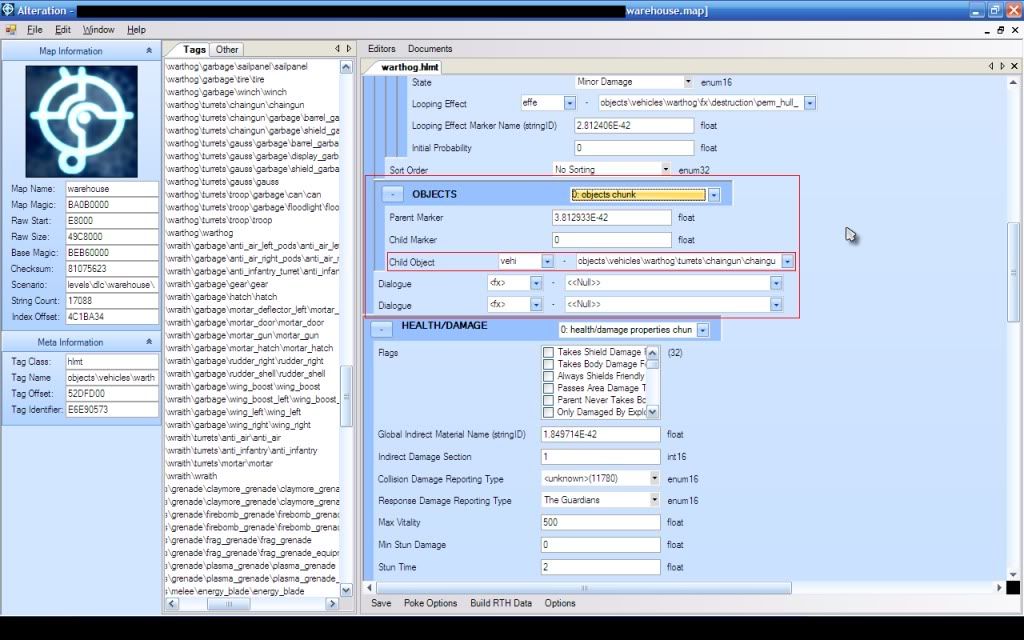
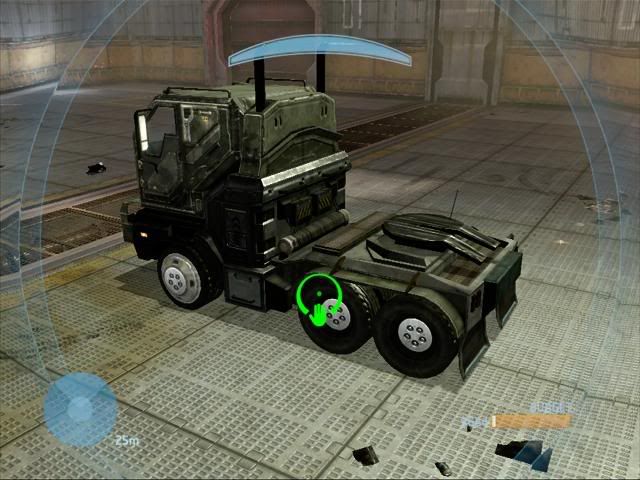
5. Change it to whatever you want to be driving, I am going to change it to a truck, for example. (you can change it
to anything within the following tags: Scen, Vehi, Weap, Bloc, Dctr, Eqip, Mach, Gint and a few more. So I would
change where it has the dropdown box that says 'Vehi' which is the vehicle tag, to 'Bloc' which is the obstacles tag.
Then I would look around in it until I found the Truck
"objects\levels\dlc\warehouse\truck_cab_large_military\truck_cab_large_military" and change it to that.
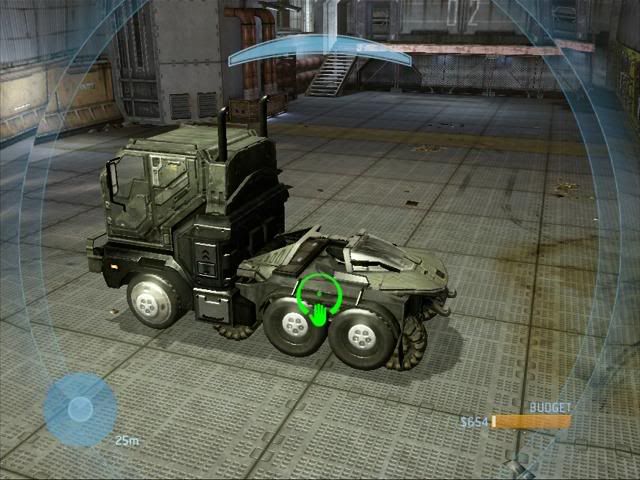
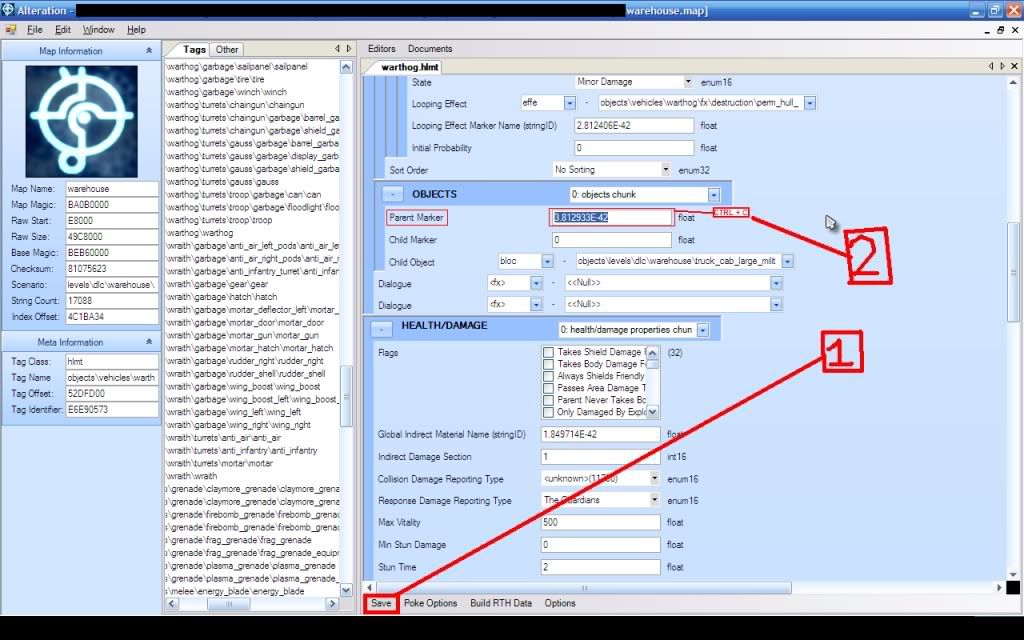
6. Now, Click the 'Save' button at the bottom. ONCE YOU HAVE GOTTEN TO THIS POINT, YOU CAN ONLY FINISH THE VEHICLE IF
YOU HAVE A DEVELOPERS KIT TO TEST IT ON, OR ARE MAKING THE SAME VEHICLE AS WE ARE IN THIS TUTORIAL(a drivable truck
on Foundry). Under 'OBJECTS' again, where it says 'Parent Marker', copy the number in the box (For example, the one I
copied is "3.812933E-42", but it is different for every map) to your clipboard (Highlight it and Hold down the 'CTRL'
button and click 'C').
7. Now in the tag list on the left again, expand the 'Mode' tag (This is the Model). Find where it says
"objects\vehicles\warthog\warthog" and click on it. Next, like we did in step 3, Click on 'Editors' right above
'Warthog.mode' and select 'Meta Editor'.
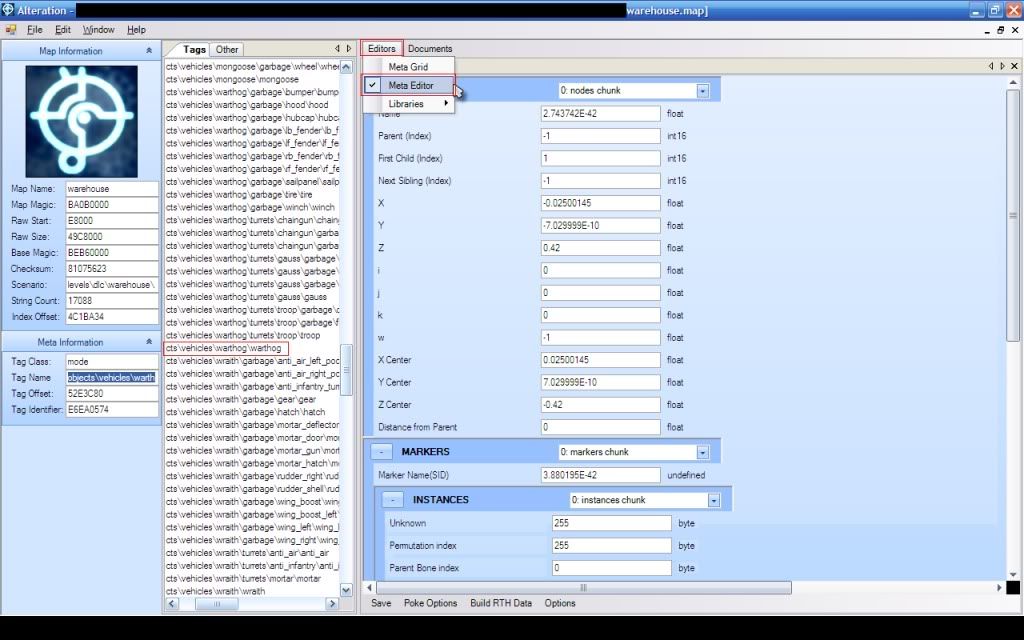
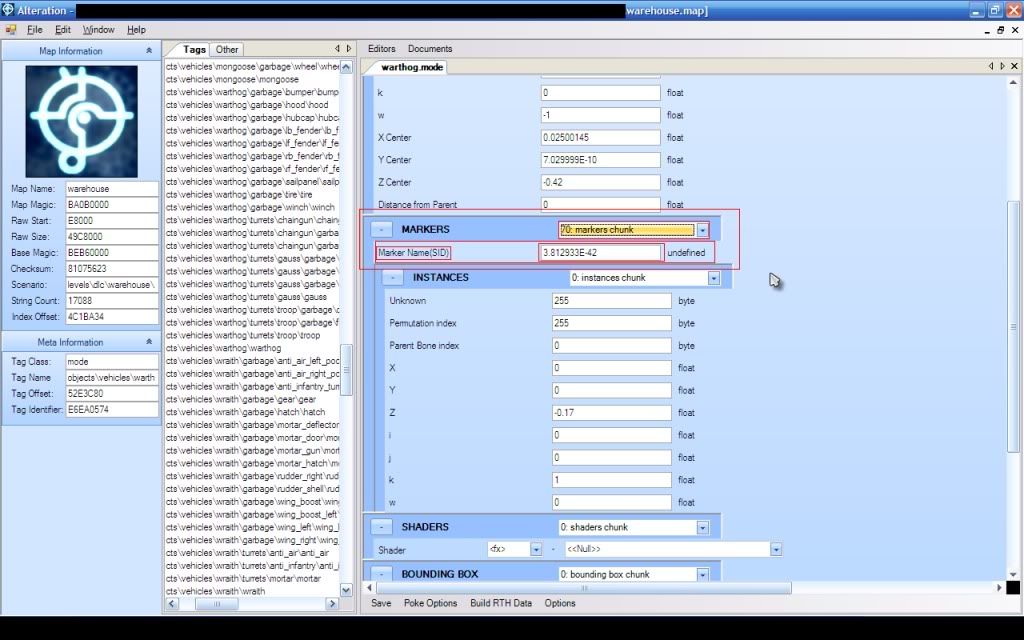
8. Scroll Down to where it says 'MARKERS' in Bold. Next to 'MARKERS' it says '0: markers chunk', click on the drop
down box twice so that '0: markers chunk' is selected in Gold color, but not expanded, and click the down arrow
button to scroll through the chunks (1, 2, 3, etc.) until the number in the box where it says 'Marker Name(SID)'
matches the number you copied to your clipboard EXACTLY (to confirm the number, highlight the number in the 'Marker
Name(SID)' box that you think matches the number on your clipboard, and Hold down CTRL and click 'V'. If the number
doesn't change, you have the right one.) In my example, the chunk is '70: markers chunk' which has the number
'3.812933E-42'.
9. Now, right under where it says 'MARKERS', it says 'INSTANCES' in Bold. This is where the coordinates and rotations
of the warthog's child object(s) are controlled.
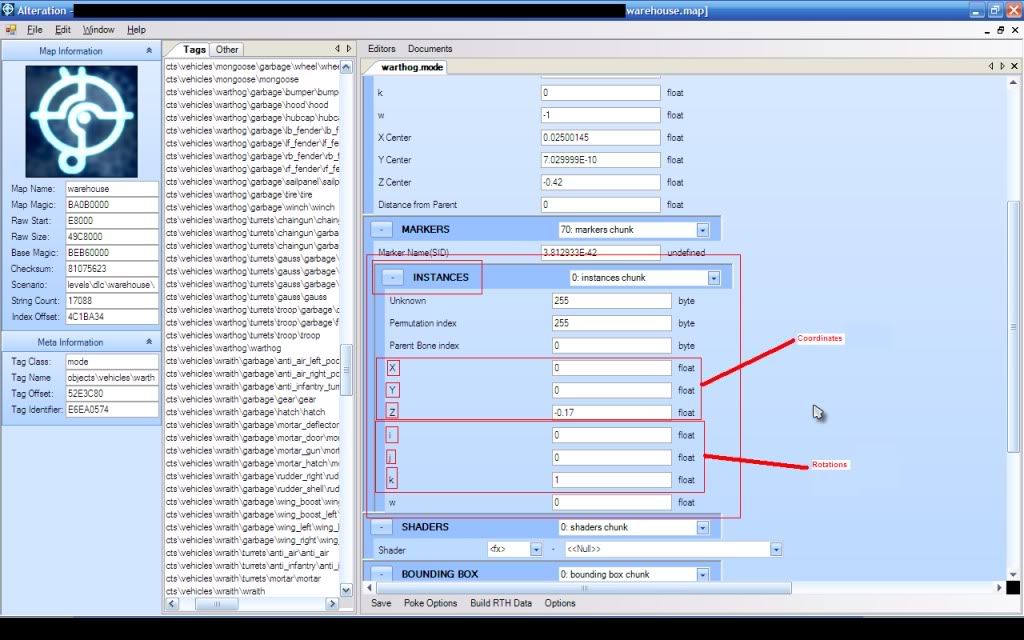
10. Using real time halo, or just testing the map over and over again on your developers kit, you need to adjust
these coordinates and rotations to make the vehicle aim in the perfect direction. For the truck, the correct
coordinates and rotations are as follows:
Coordinates:
X: 0
Y: 0
Z: 0.017
Rotations:
i: 0
j: 0
k: 1
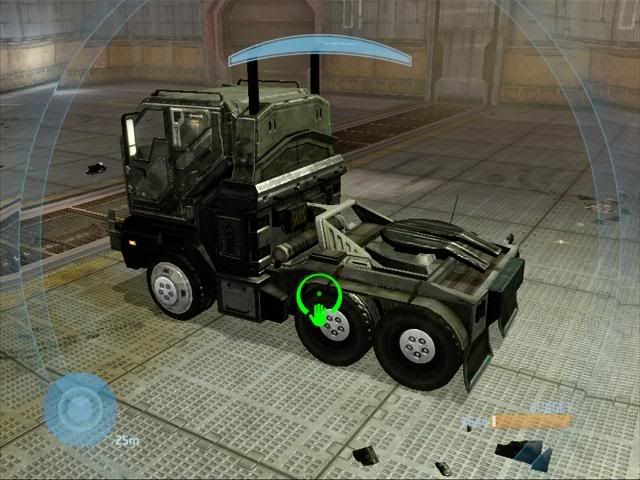
11. Now, Save your changes at the bottom again. Since we have the truck facing the right direction, and at the
perfect height, we need to make the warthog invisible so that all we can see is the truck. In the same tag that we
have been in (warthog.mode), under 'INSTANCES' in Bold it says 'SHADERS'. Now for Each chunk '0: shaders chunk'
through '13:shaders chunk'(14 chunks total), we need to change the tag in the LONG dropdown box to <<NULL>> which is
at the bottom of the list in the LONG dropdown box, So that for all 14 shaders chunks, the LONG dropdown box says
<<NULL>>. Make sure to click Save each time you change one of the boxes in each shaders chunk to <<NULL>>, so you
will end up clicking save 14 times here.
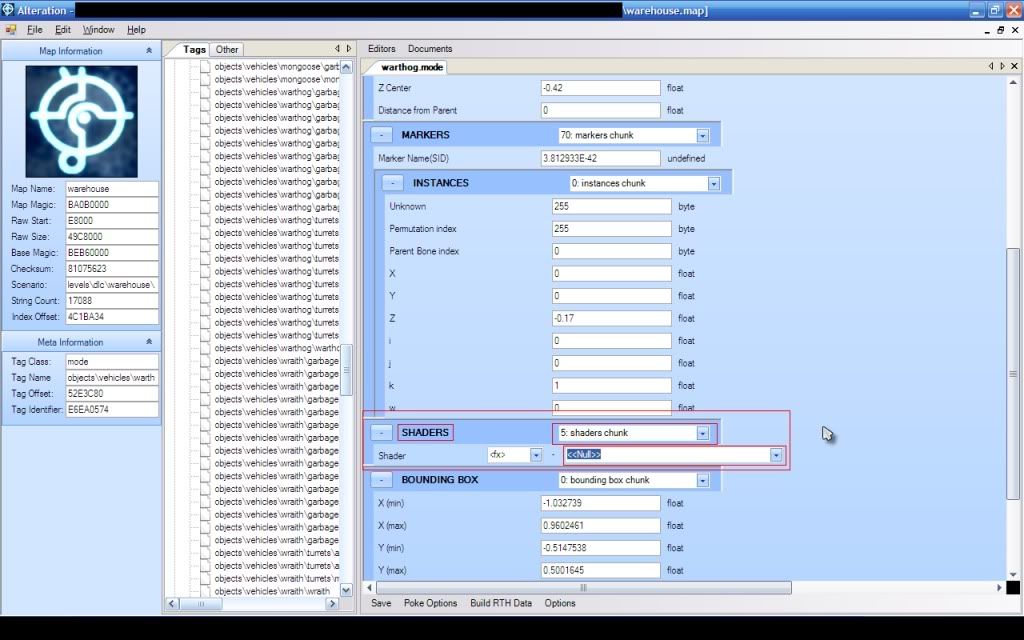
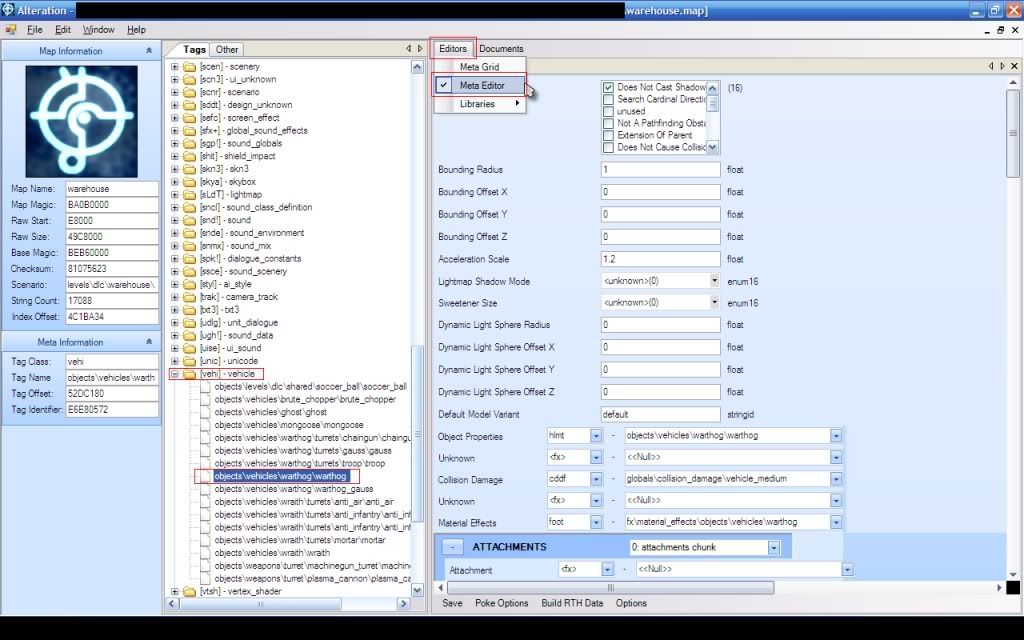
12. Now that we have nulled out the shaders we are almost done. The last things we need to change are the
attachments, widgets, and seating position for when you get into the warthog/truck. In the tag list on the left, go
down until you find the 'Vehi' tag which is Vehicle. Find where it says "objects\vehicles\warthog\warthog", and again
at the top click 'Editors' and select 'Meta Editor'.
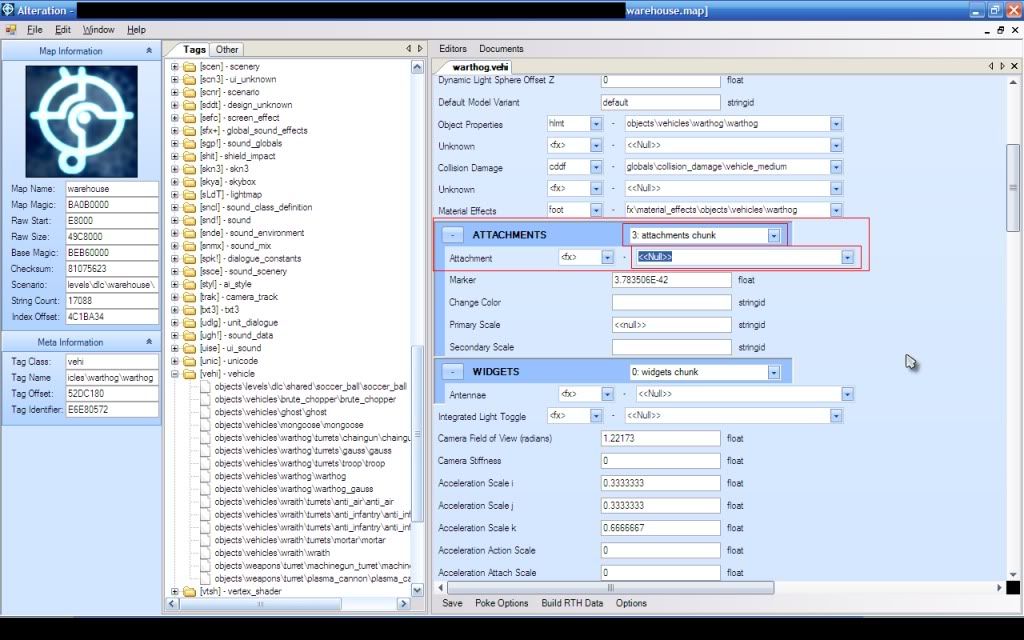
13. Scroll down until you find 'ATTACHMENTS' in Bold. Now under 'ATTACHMENTS', where it says 'Attachment', just like
for shaders, go through each attachments chunk (0 though 5) and change the LONG dropdown box in each to <<NULL>>, and
make sure again to hit save for each one. You will end up changing the LONG box to <<NULL>> 6 times and clicking save
6 times.
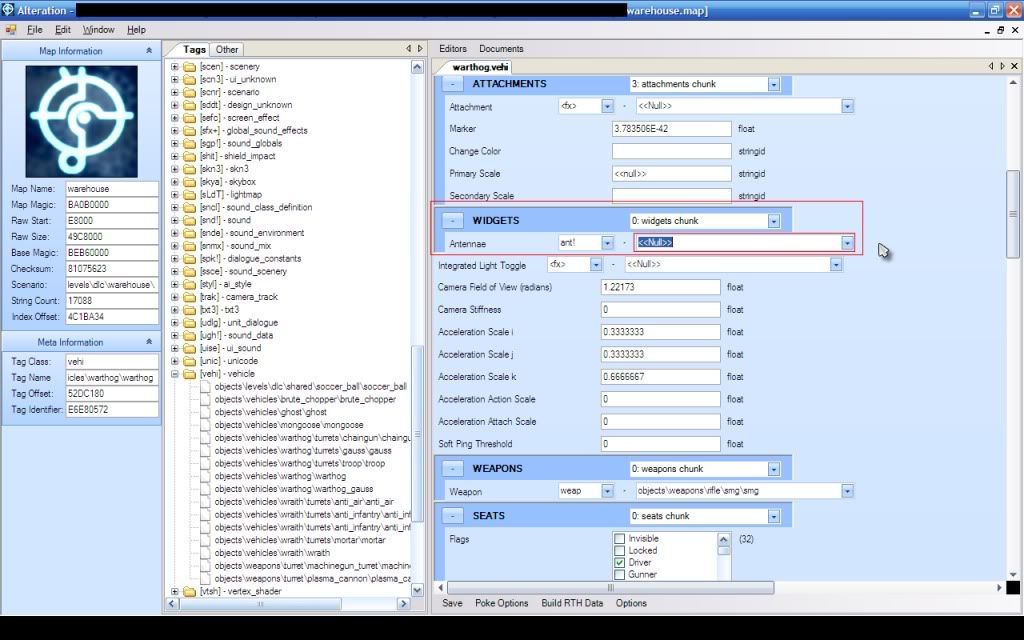
14. Right under 'ATTACHMENTS', Where it says 'WIDGETS' in Bold, change
"objects\vehicles\warthog\attachments\warthog_antenna" to <<NULL>> and click Save.
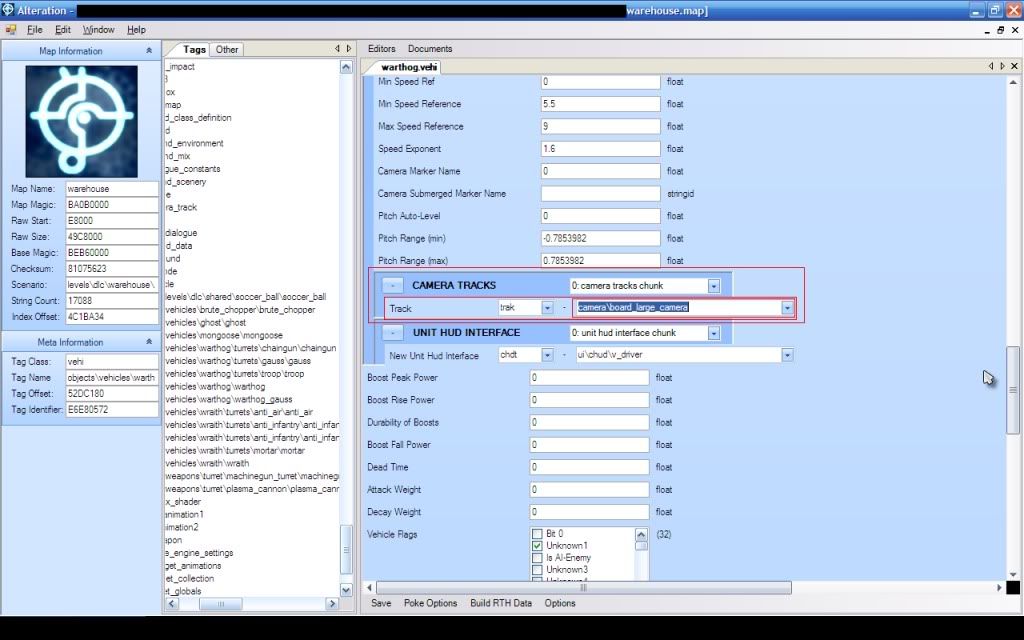
15. This step is optional, but I highly recommend it to make it look complete. If you want, you can change the camera
distance from the vehicle for a more broad view of your vehicle while driving. To do this, While still in the
warthog.vehi tag, Find where it says 'CAMERA TRACKS' in Bold and where it says Track right underneath, choose a
different Track (Camera track) from the LONG dropdown box. For the truck I recommend "camera\board_large_camera".
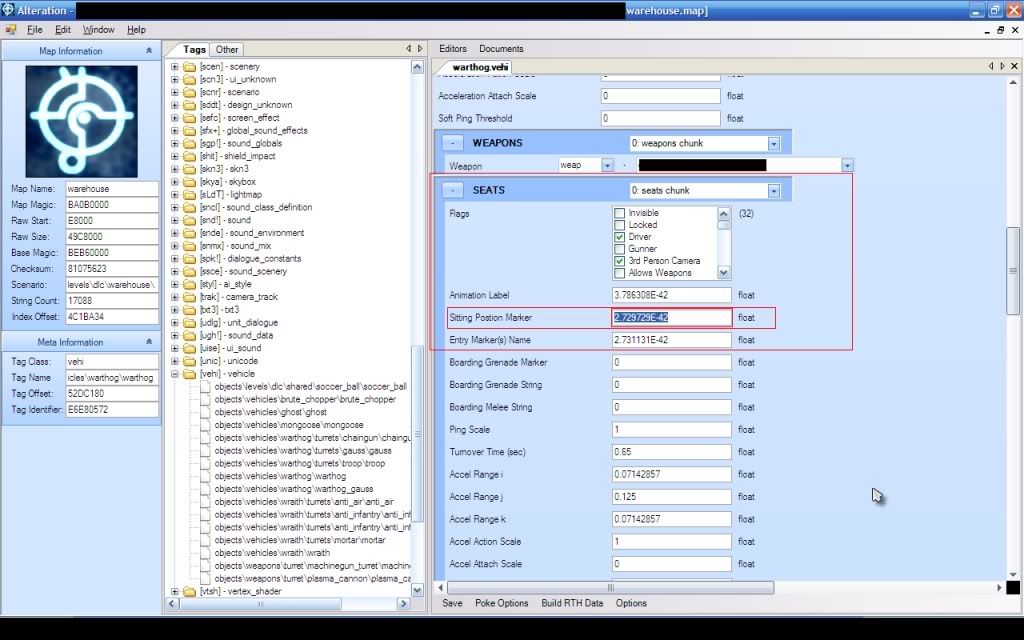
16. Now the last part, seating. In the same tag (warthog.vehi), scroll down to where it says 'SEATS' in Bold. Like we
did in step 6, copy the 'Sitting Position Marker' to your clipboard (For example, the one I copied is "2.729729E-42",
but it is different for every map).
17. Now in the tag list on the left again, expand the 'Mode' tag. Find where it says
"objects\vehicles\warthog\warthog" and click on it. Next, like we did in step 3, Click on 'Editors' right above
'Warthog.mode' and select 'Meta Editor'.

18. Scroll Down to where it says 'MARKERS' in Bold. Next to 'MARKERS' it says '0: markers chunk', click on the drop
down box twice so that '0: markers chunk' is selected in Gold color, but not expanded, and click the down arrow
button to scroll through the chunks (1, 2, 3, etc.) until the number in the box where it says 'Marker Name(SID)'
matches the number you copied to your clipboard EXACTLY (to confirm the number, highlight the number in the 'Marker
Name(SID)' box that you think matches the number on your clipboard, and Hold down CTRL and click 'V'. If the number
doesn't change, you have the right one.) In my example, the chunk is '3: markers chunk' which has the number
'2.729729E-42'.
19. Using real time halo, or just testing the map over and over again on your developers kit, you need to adjust
these coordinates and rotations to make your character sit in the perfect position when it gets inside the vehicle.
For the truck, the correct coordinates and rotations are as follows:
Coordinates:
X: 0.67
Y: 0.28
Z: 0.576
Rotations:
i: -0.1
j: 8E-10
k: -1.5E-08
20. Now click Save and you're done!
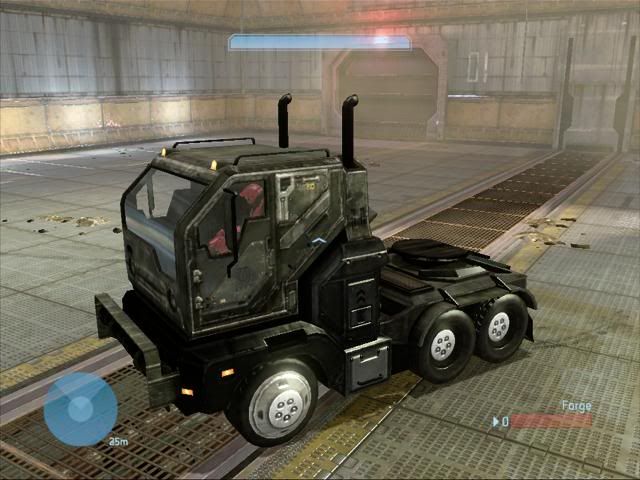
Thanks to DarkShallFall and Detox for the research and program.
Edited by halodu03de, 26 July 2009 - 12:39 AM.


