
to know exactly what parts I used and for what prices, read
this forum in the tech
center.
Parts Required for this tutorial:
All parts required
Processor
Motherboard
RAM
heatsink
case
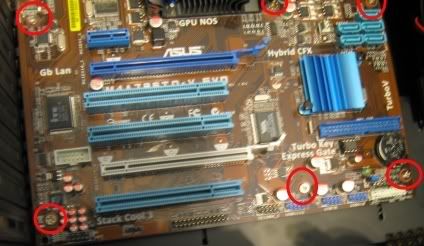
First, the motherboard. You gotta mount that thing into the
case. You should see nine holes in the motherboard and in the back of the
case. They should be in the corners, halfway between the corners, and one
in the middle of the motherboard. There should also be a small bag of
screws that came with the case. Mine came with eight so I left the middle
hole empty.
Step 2: Once you have it mounted in, next it's time for the proccesor. Be very careful with this!
You don't want anything to harm this little guy. He's the brains of the computer.
He should go into the motherboard right in this slot:
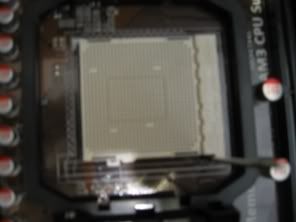
open the slot by pulling the small silver rod toward you, place the processor in the correct way and close the silver rod.
DO NOT FORCE THE PROCESSOR IN! IT SHOULD SLIDE IN NATURALLY!
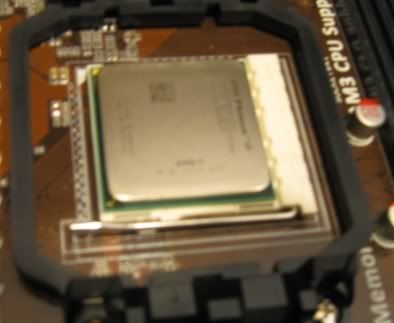
then put the heat sink on top of the processor. It should latch on pretty easily if it is an AMD heatsink. Not sure about the Intel ones.
The heatsink should have come with your processor and if it didn't, get one somewhere else before continueing. It is also very important your processor doesn't overheat.
Every Heatsink and motherboard is different, so refer to yous motherboard instruction booklet for this one. Once placed on, the heatsink should look like this:
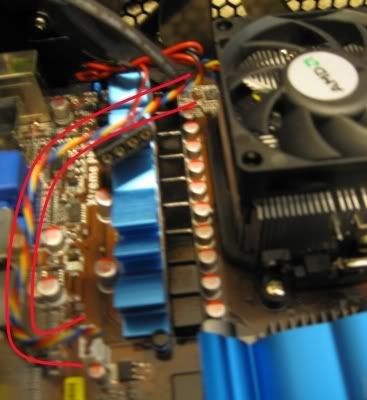
Plug the heatsink into the motherboard in the appropriate power slot. Every motherboard is different for this one too, but mine happens to be right there.
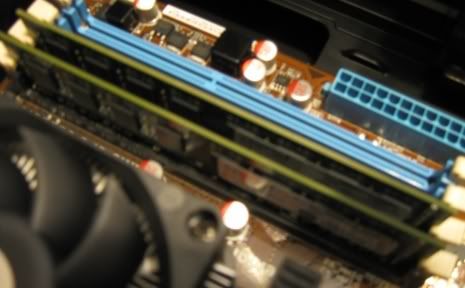
Step 4: RAM!
You should see 4 (again every motherboard is different) slots real close to each other off to one side. That is where the RAM plugs in. I recommend at least 2 GBs of RAM for the average computer. Im going to plug in 4 GBs.
Take the slots of RAM you have. find the side that has a gold tip and plug that into slot. It takes a tiny bit of force to make it go in, but once it is in, snap the clamps down, so it doesn't go anywhere.
AGAIN, DO NOT FORCE IT TOO MUCH!!!
Make sure the RAM cards are facing the right way before trying to insert them. They should look like this:
If you have all of this done, you are ready to plug it all in!!
Part 4 will be up in a few minutes
this forum in the tech
center.
Parts Required for this tutorial:
All parts required
Processor
Motherboard
RAM
heatsink
case
First, the motherboard. You gotta mount that thing into the
case. You should see nine holes in the motherboard and in the back of the
case. They should be in the corners, halfway between the corners, and one
in the middle of the motherboard. There should also be a small bag of
screws that came with the case. Mine came with eight so I left the middle
hole empty.
Step 2: Once you have it mounted in, next it's time for the proccesor. Be very careful with this!
You don't want anything to harm this little guy. He's the brains of the computer.
He should go into the motherboard right in this slot:
open the slot by pulling the small silver rod toward you, place the processor in the correct way and close the silver rod.
DO NOT FORCE THE PROCESSOR IN! IT SHOULD SLIDE IN NATURALLY!
then put the heat sink on top of the processor. It should latch on pretty easily if it is an AMD heatsink. Not sure about the Intel ones.
The heatsink should have come with your processor and if it didn't, get one somewhere else before continueing. It is also very important your processor doesn't overheat.
Every Heatsink and motherboard is different, so refer to yous motherboard instruction booklet for this one. Once placed on, the heatsink should look like this:
Plug the heatsink into the motherboard in the appropriate power slot. Every motherboard is different for this one too, but mine happens to be right there.
Step 4: RAM!
You should see 4 (again every motherboard is different) slots real close to each other off to one side. That is where the RAM plugs in. I recommend at least 2 GBs of RAM for the average computer. Im going to plug in 4 GBs.
Take the slots of RAM you have. find the side that has a gold tip and plug that into slot. It takes a tiny bit of force to make it go in, but once it is in, snap the clamps down, so it doesn't go anywhere.
AGAIN, DO NOT FORCE IT TOO MUCH!!!
Make sure the RAM cards are facing the right way before trying to insert them. They should look like this:
If you have all of this done, you are ready to plug it all in!!
Part 4 will be up in a few minutes
- REDSTAR 105, Slidell, Pargy and 1 other like this


