[HALO 2] Warthog NeonУ?ТЂУЂт??ТЌУЂт??ТЂs Tutorial
This is a tutorial, wrote by myself on how to give the warthog some pimpinУ?ТЂУЂт??ТЌУЂт??ТЂ new Neon lights for under your У?ТЂУЂт??ТЌУ?Х?hog. After releasing my Mitsubishi Lancer Skin I had my inbox filled with people asking how to give the warthog neonУ?ТЂУЂт??ТЌУЂт??ТЂs so I have made a tutorial that I hope you will all understand.
I would like to note that ScottyGEE was the first to work out how to give the warthog under-car lights, so credit goes to him on his discovery.
**Step One**
Firstly , open your map in Insolence , go to the [ligh] tag, and find effectsobjectsvehiclesghostghost_plasma_vent as shown below
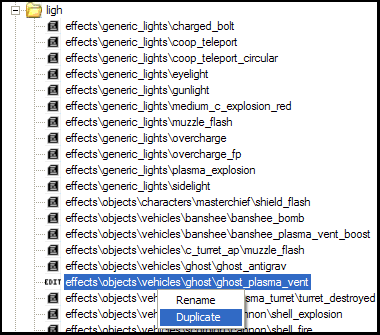
Right click and hit Duplicate. After a second or two, you should see directly underneath it effectsobjectsvehiclesghostghost_plasma_vent2 У?ТЂУЂт??ТЌУЂт?ЌХ? this is the light weУ?ТЂУЂт??ТЌУЂт??ТЂre going to use for our neons. Close Insolence for the time being.
**Step Two**
Now Open DotHalo, go to the [vehi] tag and find the warthog. In the dependency/reflexives window, find the dependency objectsvehicleswarthogattatchmentswarthog_hea dlights and change it to effectsobjectsvehiclesghostghost_plasma_vent2 using the drop down list, hit save changes in the dependencies window and it should now look like this:
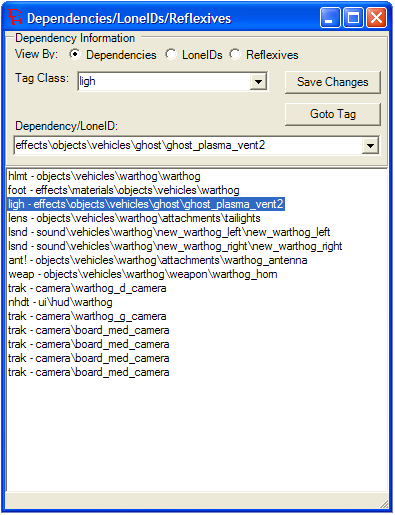
Now look at the Tag Editor for the Warthog (Still in DotHalo) and set the Warthog Headlights (Actual Lights) to be У?ТЂУЂт??ТЌУ?Х?OnУ?ТЂУЂт??ТЌУЂт??ТЂ and the Warthog Headlights (Effects on Ground/Walls) to also be У?ТЂУЂт??ТЌУ?Х?OnУ?ТЂУЂт??ТЌУЂт??ТЂ. We are now finished with DotHalo.
**Step Three**
Now it is time to choose the colour of your neon lighting, and the size of the area it will cover. For this we will use ADI as I feel it is the best application for editing lights in Halo 2.
Open your map in ADI and find your ghost_plasma_vent2 meta in the [ligh] tag and click the Tag Editor button found at the bottom left of the application, assuming you have the correct plugins for ADI you should see a series of values as shown below:
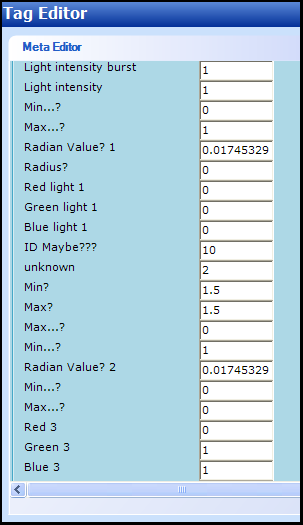
Increase both Radian Values 1 and 2 to around 0.05 or whatever value you wish, I suggest 0.05 as it makes the light cover the entire area of the У?ТЂУЂт??ТЌУ?Х?hog like real neons. However if you want your neons to have more or less spread, edit this value accordingly.
Now you can change the colour of your neon lights by editing the RGB Values. If you want green neons, change all the У?ТЂУЂт??ТЌУ?Х?GreenУ?ТЂУЂт??ТЌУЂт??ТЂ Values to 1 then change the Red and Blue Values to 0. If you want Red neons, changes the У?ТЂУЂт??ТЌУ?Х?RedУ?ТЂУЂт??ТЌУЂт??ТЂ Values to 1 then change the green and blue values to 0. The same applies for any other colours. If you want colours other then Red, Green or Blue, for example purple, experiment with the RGB valuesУ?ТЂУЂт??ТЌУ?ТІ for purple IУ?ТЂУЂт??ТЌУЂт??ТЂd suggest a combination of Red and Blue, so set all the Red and Blue values to 0.5 and set the green values to 0. This should make purple neons. Once youУ?ТЂУЂт??ТЌУЂт??ТЂve done this close ADI and move onto the next step.
**Step Four**
Now we need to change some markers so the light spawns under the У?ТЂУЂт??ТЌУ?Х?hog, not where the headlights are. Open the map in Insolence and go to the [mode] tag. Find objectsvehicleswarthogwarthog
Click Edit, and click the У?ТЂУЂт??ТЌУ?Х?MarkerУ?ТЂУЂт??ТЌУЂт??ТЂ Reflexive, the headlights are number 9 on the drop down list, select number 9 and then click У?ТЂУЂт??ТЌУ?Х?CoordinatesУ?ТЂУЂт??ТЌУЂт??ТЂ and edit the У?ТЂУЂт??ТЌУ?Х?YУ?ТЂУЂт??ТЌУЂт??ТЂ value to 0.001747948, the У?ТЂУЂт??ТЌУ?Х?XУ?ТЂУЂт??ТЌУЂт??ТЂ value to 8E-11 and the У?ТЂУЂт??ТЌУ?Х?ZУ?ТЂУЂт??ТЌУЂт??ТЂ value to -0.3428424 As show in the image below:
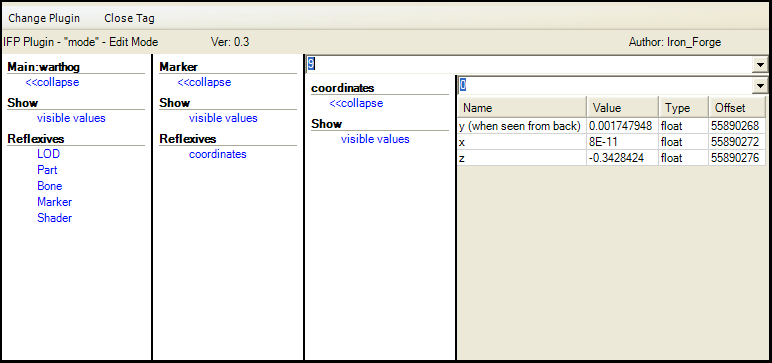
This now tells the game where to spawn your new neon lights, these coordinates are just under the hull of the warthog in the center, so the light shines evenly under the У?ТЂУЂт??ТЌУ?Х?hog.
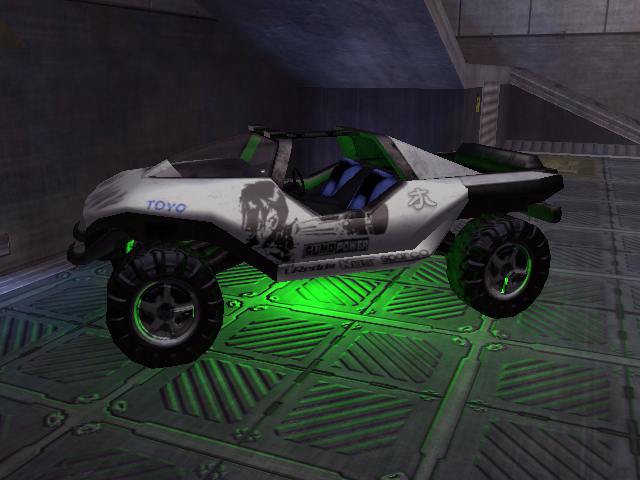
Close Insolence, Resign your map and FTP it to your Xbox, you should now have some sweet under-car neons for your WarthogУ?ТЂУЂт??ТЌУ?ТІ