
Screen Layout:
Each screen in the BIOS contains a lot of information.
Taken from X3 Busted Chain to try and preserve the last traces of Xecuter 3 Tutorials
Common Controller Buttons:
A certain set of buttons works for nearly all screens for various functions. Only buttons that are used are listed:
Each screen in the BIOS contains a lot of information.
Taken from X3 Busted Chain to try and preserve the last traces of Xecuter 3 Tutorials
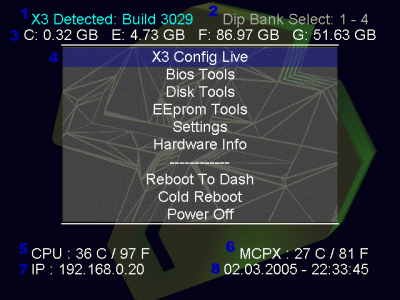
- 1. X3 Build: This is the version of the X3 BIOS you have installed on the modchip.
- 2. Dip Bank Select: This indicates which selected banks are being used to boot the BIOS. Generaly this will show "1-4" or "5-8" since the X3 BIOS is 1024KB and each single bank is 256KB.
- 3. Harddrive Space: This line displays how much harddrive space is available on each of the installed drives. C: & E: will be there for sure. F: and G: are only used if you have a harddrive in your XBOX that is large enough.
- 4. User Area: This list presents options you can select by moving the D-Pad or Thumbstick up or down and pressing "A" on the controller.
- 5. CPU: This displays the current processor temperature in degrees Celcius and Fahrenheit. Temperature should range from about 40�-65�C (104�-149�F). Your XBOX will overheat and shutoff at 71�C (160�F).
- 6. MCPX: This displays the current Media and Communications Processor temperature in degrees Celcius and Fahrenheit. This temperature is generally cooler than the CPU.
- 7. IP: This is the current IP address the X3 chip and XBOX is using. This is either statically assigned in "Settings" under "Network" or assigned by a router or server on your network running DHCP.
- 8. Date & Time: The current date and time as set on the XBOX.
Common Controller Buttons:
A certain set of buttons works for nearly all screens for various functions. Only buttons that are used are listed:
- Digital Pad or Left Thumbstick: Navigation only. Move up or down in menus, or move around on the virtual screen keyboard when typing in file and/or BIOS names. These controls are used purely for highlighting selections on the screen.
- Right Thumbstick: Press down on this thumbstick to switch between lower and upper case letters on the virtual keyboard.
- A: In this guide I refer to "clicking" on options because I've written a lot of instructions for operating systems and it is a force of habit. This button is used to confirm selections.
- B: This button is used to go "back" or "cancel" a screen in many cases and after the main BIOS is flashed, you can press this button to "Continue" without customizing the newly flashed BIOS' name.
- X: This button is used on the screen after the main BIOS is flashed to bring up the virtual onscreen keyboard and name the newly flashed BIOS. The virtual onscreen keyboard uses this button to delete the last letter entered.
- Y: This button is only used on the virtual onscreen keyboard to store the name that is entered.
- Back + Black: Reboot your XBOX from the X3 BIOS screens by pressing both buttons at the same time.
- Back + White: Take a screenshot by pressing both buttons at the same time. Your screenshot will be saved in bitmap format to E:\x3screenshots on the XBOX hard drive. (Via FTP, this is usually /E/x3screenshots).
- Power + TIME: Push and hold the power button down to turn on the XBOX with the modchip disabled.
- Power + Eject: Push both the power and the eject button and hold them for a moment to boot up the and make the X3 modchip load the backup BIOS. (Very useful if you screw up your main BIOS.)


